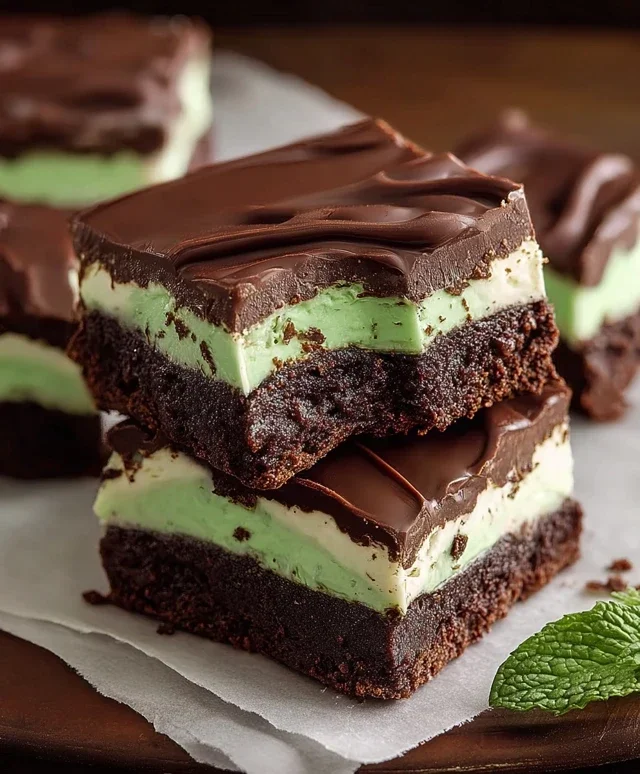
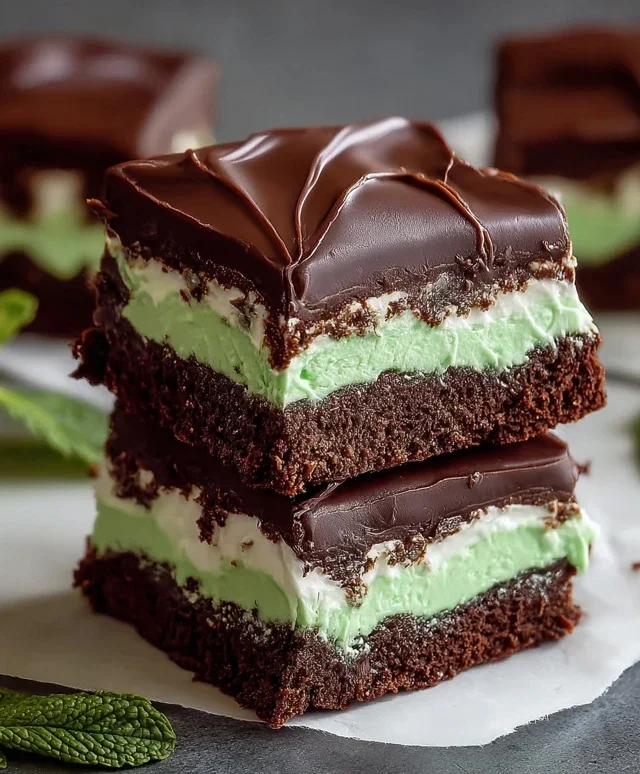
Triple Chocolate Mint Squares – Rich & Decadent Treat
Triple-layer chocolate mint squares are an absolute dream for any dessert lover! If you’re anything like me, the combination of rich chocolate and refreshing mint is pure bliss. This isn’t just any chocolate mint treat; these triple-layer chocolate mint squares elevate the classic pairing into something truly spectacular. Imagin extracte a decadent chocolate base, a creamy, mint-infused middle layer, all topped with a glossy, intensely chocolatey ganache. It’s a symphony of textures and flavors that dance on your palate, making every bite an experience. They’re perfect for holidays, parties, or just when you need a seriously satisfying sweet escape. Get ready to impress yourself and everyone lucky enough to share these irresistible triple-layer chocolate mint squares!
Triple-Layer Chocolate Mint Squares
There’s something undeniably decadent about a perfectly layered dessert, and these Triple-Layer Chocolate Mint Squares are no exception. They offer a delightful trifecta of rich chocolate, creamy mint, and a chewy brownie base, making them a showstopper for any occasion. Whether you’re a seasoned baker or just looking to impress your friends and family, this recipe is surprisingly manageable and incredibly rewarding. The combination of deep chocolate flavor with the refreshing zing of mint is truly irresistible. We’re going to break this down into three distinct layers, each contributing its own unique texture and taste to the final masterpiece. Get ready to indulge!
Ingredients:
Instructions:
Layer 1: The Chewy Chocolate Base
The foundation of our delicious squares starts with a rich, fudgy brownie base. We’ll begin extract by melting together the first set of ingredients. In a medium saucepan over low heat, combine 1 cup of salted butter and 4 oz. of semi-sweet chocolate chips. Stir gently and continuously until both the butter and chocolate are completely melted and smooth. It’s important to use low heat to prevent the chocolate from scorching. Once melted, remove the pan from the heat and set it aside to cool slightly.
In a separate large bowl, whisk together 2 cups of granulated sugar and 2 teaspoons of vanilla extract. Add the 4 large eggs, one at a time, whisking well after each addition until the mixture is smooth and glossy. Now, gradually pour the slightly cooled chocolate and butter mixture into the sugar and egg mixture, whisking until everything is well combined and you have a uniformly chocolatey batter.
Next, it’s time to incorporate the dry ingredients. Sift in 1 ½ cups of all-purpose flour. Gently fold the flour into the wet ingredients using a spatula until just combined. Be careful not to overmix, as this can lead to tough brownies. Overmixing develops the gluten in the flour more than necessary, resulting in a less tender texture. Aim for a batter that is thick but pourable.
Prepare an 8×8 inch baking pan by greasing it well and lining it with parchment paper, leaving an overhang on the sides. This overhang will make it easier to lift the baked brownies out of the pan later. Pour the brownie batter into the prepared pan and spread it evenly. Bake in a preheated oven at 350°F (175°C) for 25-30 minutes, or until a toothpick inserted into the center comes out with moist crum extractbs attached. Do not overbake, as we want a chewy, fudgy texture. Let the brownie base cool completely in the pan on a wire rack before proceeding to the next layer. Patience is key here to ensure clean layers.
Layer 2: The Creamy Mint Frosting
While our brownie base is cooling, we’ll prepare the vibrant green mint frosting. In a large bowl, cream together ¾ cup of softened salted butter and 3 cups of powdered sugar until light and fluffy. A stand mixer with a paddle attachment works best for this, but a hand mixer can also do the job. Make sure the butter is truly softened, not melted, to achieve the best texture.
Add 1 tablespoon of heavy whipping cream and 1 teaspoon of peppermint extract to the butter and sugar mixture. Begin extract mixing on low speed to incorporate the wet ingredients without creating a powdered sugar cloud, then increase the speed to medium-high. Continue mixing until the frosting is smooth and creamy.
Now for the fun part – the color! Add 10 drops of green food coloring, or adjust the amount to your desired shade of minty green. Mix thoroughly until the color is evenly distributed. You want a beautiful, vibrant green that pops against the dark chocolate. Taste the frosting and adjust peppermint extract if a stronger mint flavor is desired, but remember it will be balanced by the chocolate layers. Once the brownie base is completely cool, spread this creamy mint frosting evenly over the top, creating a smooth, consistent layer.
Layer 3: The Rich Chocolate Ganache Topping
Our final layer is a luscious chocolate ganache that brings everything together. In a heatproof bowl, combine 3 cups of semi-sweet chocolate chips and 2 tablespoons of butter. Place this bowl over a saucepan filled with about an inch of simmering water. Ensure the bottom of the bowl does not touch the water. Stir the chocolate and butter mixture gently until it is completely melted and smooth. This method, called a double boiler, provides gentle, even heat, preventing the chocolate from burning.
Once the chocolate is melted and glossy, remove the bowl from the heat. Stir in ½ cup of heavy whipping cream until the ganache is smooth and emulsified. The ganache should be pourable but not too thin. If it seems too thick, you can add a tiny bit more cream, a teaspoon at a time. If it seems too thin, let it sit for a few minutes at room temperature to thicken slightly.
Allow the ganache to cool for about 5-10 minutes, stirring occasionally, until it has thickened enough to pourable but not runny. This is important for achieving a nice, even top layer. Carefully pour the warm ganache over the mint frosting layer, tilting the pan gently to spread it evenly across the surface. You can also use an offset spatula to help spread it if needed.
Once the ganache is spread, let the entire pan of squares sit at room temperature for about 30 minutes to allow the ganache to set slightly. Then, refrigerate the pan for at least 1-2 hours, or until the ganache is firm and set. This chilling time is crucial for clean cuts.
When ready to serve, use the parchment paper overhang to lift the entire slab out of the pan. Place it on a cutting board and use a sharp knife, dipped in hot water and wiped dry between cuts, to slice into desired square portions. Enjoy your exquisite Triple-Layer Chocolate Mint Squares!
Conclusion:
And there you have it – your guide to creating these absolutely divine triple-layer chocolate mint squares! This recipe is truly a winner because it delivers on all fronts: intensely rich chocolate, a refreshing hint of mint, and a satisfying texture that’s both fudgy and slightly chewy. Whether you’re a seasoned baker or just dipping your toes into the dessert world, I promise you’ll be thrilled with the results. These squares are perfect for any occasion, from a casual afternoon treat to a show-stopping dessert for your next gathering. I highly recommend serving them chilled, perhaps with a dollop of whipped cream or a dusting of cocoa powder, for an extra touch of elegance. For those who love to experiment, don’t be afraid to try variations! Consider adding a swirl of white chocolate ganache to the top layer for a visual and flavor contrast, or perhaps a sprinkle of chopped dark chocolate mint candies for an extra crunch. I genuinely encourage you to give these triple-layer chocolate mint squares a try. They are surprisingly easy to make and the reward is incredibly delicious. Happy baking!
Frequently Asked Questions:
Can I make these vegan?
Yes, absolutely! To make these triple-layer chocolate mint squares vegan, you’ll want to substitute the butter with vegan butter or coconut oil (refined to avoid a coconut flavor). For the eggs, a common substitute is a flax egg (1 tablespoon ground flaxseed mixed with 3 tablespoons water, let sit for 5 minutes) or a commercial egg replacer. Ensure your chocolate chips are also dairy-free.
How long do these squares last?
Stored in an airtight container in the refrigerator, these triple-layer chocolate mint squares will stay delicious for up to 5 days. They tend to firm up slightly when chilled, which many people find enhances their texture.
What’s the best way to cut them cleanly?
For the cleanest cuts, I find it’s best to chill the entire pan of baked squares for at least an hour before attempting to cut them. Use a sharp, thin knife, and wipe the blade clean with a damp cloth between each cut. This prevents the chocolate from smearing and ensures you get those perfect, neat edges.
Triple-Layer Chocolate Mint Squares
Decadent triple-layer chocolate squares with a minty frosting, perfect for any celebration.
Ingredients
-
1 cup salted butter
-
4 oz. semi-sweet chocolate chips
-
2 cups granulated sugar
-
1 ½ cups all-purpose flour
-
4 large eggs
-
¾ cup salted butter, softened
-
3 cups powdered sugar
-
1 tablespoon heavy whipping cream
-
1 teaspoon peppermint extract
-
10 drops green food coloring
-
3 cups semi-sweet chocolate chips
-
2 tablespoons butter
-
½ cup heavy whipping cream
Instructions
-
Step 1
Preheat oven to 350°F (175°C). Grease and flour a 9×13 inch baking pan. Melt 1 cup salted butter and 4 oz. semi-sweet chocolate chips together. Stir in 2 cups granulated sugar and 2 teaspoons vanilla extract. Beat in 4 large eggs one at a time. Stir in 1 ½ cups all-purpose flour until just combined. Spread batter evenly into the prepared pan. -
Step 2
Bake for 30-35 minutes, or until a toothpick inserted into the center comes out clean. Let cool completely in the pan. -
Step 3
For the frosting: In a large bowl, beat ¾ cup softened salted butter until creamy. Gradually add 3 cups powdered sugar, alternating with 1 tablespoon heavy whipping cream, until smooth and spreadable. -
Step 4
Stir in 1 teaspoon peppermint extract and 10 drops green food coloring. Mix until evenly colored and well combined. Spread the mint frosting evenly over the cooled chocolate base. -
Step 5
For the chocolate topping: Melt 3 cups semi-sweet chocolate chips with 2 tablespoons butter and ½ cup heavy whipping cream in a microwave-safe bowl in 30-second intervals, stirring in between, until smooth. -
Step 6
Pour the melted chocolate evenly over the mint frosting. Let the chocolate set completely before cutting into squares.
Important Information
Nutrition Facts (Per Serving)
It is important to consider this information as approximate and not to use it as definitive health advice.
Allergy Information
Please check ingredients for potential allergens and consult a health professional if in doubt.