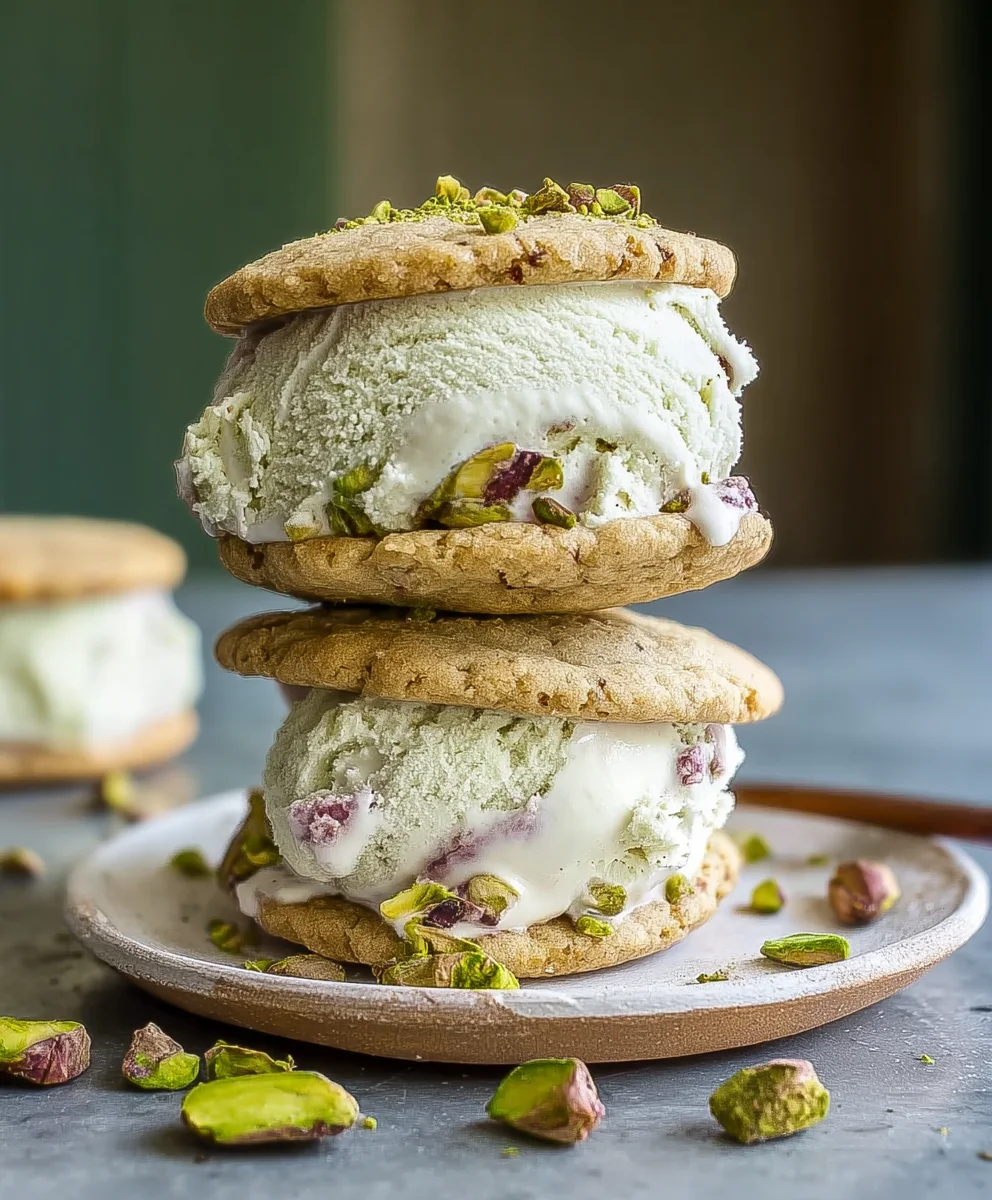
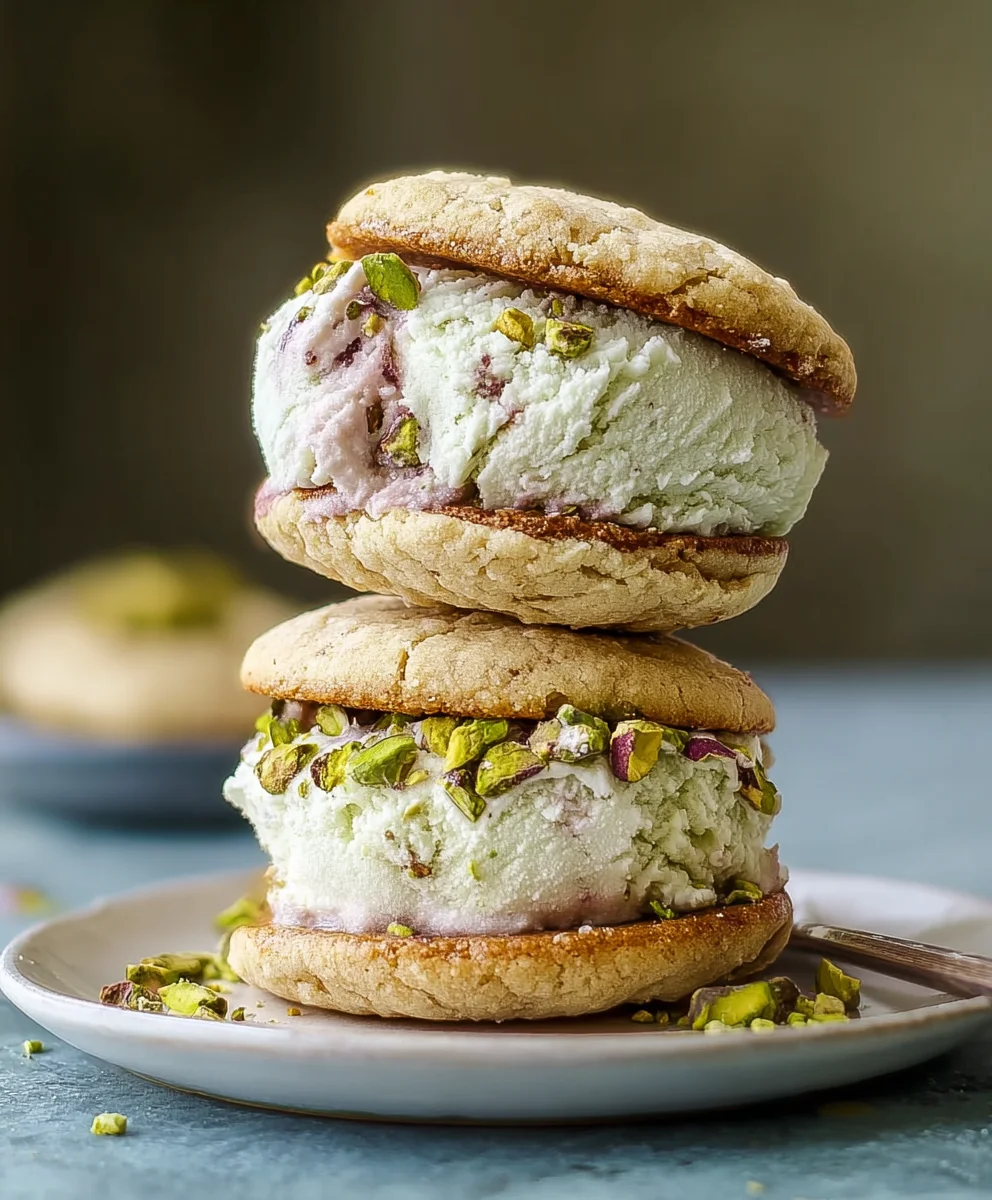
Pistachio Cookie Ice Cream Sandwiches – Sweet Treat
Pistachio Cookie Ice Cream Sandwiches are more than just a dessert; they’re a delightful symphony of textures and flavors that will transport your taste buds to pure bliss. Imagin extracte the satisfying crunch of a homemade pistachio cookie giving way to a creamy, cool wave of ice cream – it’s an experience that has captured the hearts (and stomachs) of dessert lovers everywhere. What makes these treats so incredibly special? It’s the perfect marriage of nutty, slightly sweet pistachio cookies, often infused with a hint of vanilla or almond, cradling your favorite ice cream flavor. Whether you opt for classic vanilla bean, a rich chocolate, or even a complementary pistachio ice cream, each bite is a carefully crafted moment of joy. They’re relatively simple to assemble, making them a fantastic project for a weekend treat or a crowd-pleasing option for your next gathering. Get ready to discover why Pistachio Cookie Ice Cream Sandwiches deserve a permanent spot in your dessert repertoire!
Ingredients:
- 1 cup unsalted butter, softened
- ¾ cup granulated sugar
- 1 large egg
- 1 teaspoon vanilla extract
- 2 cups all-purpose flour
- ½ cup finely ground pistachios
- ¼ teaspoon salt
- 2 cups vanilla ice cream, slightly softened
- ¼ cup chopped pistachios (for rolling)
Preparing the Cookie Dough
Step 1: Creaming the Butter and Sugar
Begin extract by placing the softened unsalted butter in a large mixing bowl. Ensure your butter is truly softened, not melted, as this is crucial for achieving a light and fluffy texture. Add the granulated sugar to the butter. Using an electric mixer, beat these two ingredients together on medium speed until the mixture becomes pnon-alcoholic ale yellow and fluffy. This process, known as creaming, incorporates air into the dough, which will contribute to the cookies’ delicate texture. Scrape down the sides of the bowl occasionally with a rubber spatula to ensure all the butter and sugar are evenly combined. This usually takes about 2-3 minutes.
Step 2: Incorporating Wet Ingredients
Once the butter and sugar are well creamed, it’s time to add the remaining wet ingredients. Crack the large egg into the bowl. Add the pure vanilla extract. Continue mixing with the electric mixer on medium speed until the egg and vanilla are fully incorporated into the creamed mixture. It’s important not to overmix at this stage. Just until everything looks homogenous is perfect. The aroma of the vanilla extract will start to fill your kitchen, a delightful preview of the delicious cookies to come.
Step 3: Combining Dry Ingredients and Dough Formation
In a separate medium bowl, whisk together the all-purpose flour, the finely ground pistachios, and the salt. Whisking these dry ingredients beforehand ensures they are evenly distributed, preventing pockets of salt or flour in your final cookies. Gradually add this dry mixture to the wet ingredients in the large mixing bowl. Mix on low speed until just combined. Be careful not to overmix the dough once the flour is added, as this can lead to tough cookies. You want the dough to just come together. It will be a slightly soft dough at this point.
Chilling and Shaping the Dough
Step 4: Chilling the Dough
Now that your cookie dough is ready, it needs a brief chill. This step is vital for making the dough easier to handle and for preventing the cookies from spreading too much during baking. Divide the dough in half. Shape each half into a flat log, about 6-7 inches long. Wrap each log tightly in plastic wrap, ensuring no air can get in. Place the wrapped dough logs in the refrigerator for at least 30 minutes, or up to 2 days. This chilling period allows the fats in the butter to firm up, making slicing and baking much more controlled.
Baking the Pistachio Cookies
Step 5: Slicing and Baking
Preheat your oven to 350°F (175°C). Line two baking sheets with parchment paper. This prevents sticking and makes cleanup a breeze. Remove one chilled dough log from the refrigerator at a time. Unwrap it and use a sharp knife to slice the log into ¼-inch thick rounds. Place these cookie slices onto the prepared baking sheets, leaving about 2 inches of space between them to allow for slight expansion. Bake for 10-12 minutes, or until the edges are lightly golden brown and the centers are set but still appear slightly soft. Do not overbake, as they will continue to cook slightly on the hot baking sheet. Let the cookies cool on the baking sheets for 5 minutes before transferring them to a wire rack to cool completely. Repeat with the second dough log.
Assembling the Pistachio Cookie Ice Cream Sandwiches
Step 6: Constructing the Sandwiches
Once the pistachio cookies have cooled completely, it’s time for the exciting part – assembling the ice cream sandwiches! Make sure your vanilla ice cream is slightly softened, so it’s scoopable but not melted. Take two cooled cookies and place one flat-side up. Scoop a generous portion of the softened vanilla ice cream onto the flat side of this cookie. You don’t want too much, or it will squeeze out excessively. Gently place the second cookie, flat-side down, on top of the ice cream. Press down lightly to form a beautiful sandwich.
Step 7: Rolling in Chopped Pistachios
To add that extra layer of flavor and delightful crunch, we’ll roll the edges of the ice cream sandwiches in chopped pistachios. Have your ¼ cup of chopped pistachios ready in a shallow dish. Gently press the sides of each assembled ice cream sandwich into the chopped pistachios, coating the exposed ice cream and cookie edges. This not only looks impressive but also adds a lovely nutty texture that complements the pistachio cookies and vanilla ice cream perfectly.
Step 8: Freezing for the Perfect Finish
For the ultimate ice cream sandwich experience, they need a final chill to firm up the ice cream. Place the finished pistachio cookie ice cream sandwiches on a baking sheet lined with parchment paper. Transfer the baking sheet to your freezer. Let them freeze for at least 1-2 hours, or until the ice cream is firm. This freezing step is essential for achieving that satisfying bite where the cookie and ice cream are perfectly cohesive. Enjoy these delightful homemade treats!
Conclusion:
You’ve now unlocked the secret to creating delightful Pistachio Cookie Ice Cream Sandwiches right in your own kitchen! This recipe offers a wonderful balance of nutty, sweet, and creamy, making it a truly memorable treat. The tender, slightly chewy pistachio cookies perfectly complement the rich ice cream, and the optional drizzle adds an extra layer of indulgence. Don’t be afraid to get creative!
For serving suggestions, these Pistachio Cookie Ice Cream Sandwiches are fantastic on their own for an afternoon pick-me-up or as an elegant dessert after a meal. They also make a stunning addition to any party spread. Consider cutting them in half for smaller portions or serving them alongside a cup of coffee or tea.
As for variations, feel free to experiment with different ice cream flavors – a classic vanilla bean or a complementary raspberry sorbet would be divine. You can also toast the pistachios for a deeper flavor in the cookies. And for an extra textural element, try rolling the edges in finely chopped pistachios or even some mini chocolate chips before the ice cream fully sets.
The joy of making these Pistachio Cookie Ice Cream Sandwiches is in the process and the delicious outcome. I encourage you to try this recipe and share these homemade delights with your loved ones. The smiles you’ll bring will be as sweet as the cookies themselves!
Frequently Asked Questions about Pistachio Cookie Ice Cream Sandwiches:
Can I make the pistachio cookie dough ahead of time?
Yes, absolutely! You can prepare the pistachio cookie dough up to 2 days in advance and store it, tightly wrapped, in the refrigerator. This can actually improve the flavor and texture. Just let it sit at room temperature for about 15-20 minutes before scooping and baking.
What kind of ice cream works best with these cookies?
While vanilla bean is a classic and always a winner, I highly recommend trying a pistachio ice cream for an intensified nutty flavor. Other excellent choices include raspberry, salted caramel, or even a good quality dark chocolate ice cream. The key is to choose an ice cream that complements the almond-like sweetness of the pistachios without overpowering them.
Pistachio Cookie Ice Cream Sandwiches – Sweet Treat
Delightful homemade ice cream sandwiches featuring soft pistachio cookies filled with creamy vanilla ice cream and rolled in chopped pistachios.
Ingredients
-
1 cup unsalted butter, softened
-
¾ cup granulated sugar
-
1 large egg
-
1 teaspoon vanilla extract
-
2 cups all-purpose flour
-
½ cup finely ground pistachios
-
¼ teaspoon salt
-
2 cups vanilla ice cream, slightly softened
-
¼ cup chopped pistachios (for rolling)
Instructions
-
Step 1
Cream softened unsalted butter and granulated sugar in a large bowl with an electric mixer until pale yellow and fluffy. This usually takes about 2-3 minutes. Scrape down the sides of the bowl occasionally. -
Step 2
Add the large egg and vanilla extract to the creamed mixture. Mix with the electric mixer on medium speed until fully incorporated. Do not overmix. -
Step 3
In a separate bowl, whisk together the all-purpose flour, finely ground pistachios, and salt. Gradually add this dry mixture to the wet ingredients and mix on low speed until just combined. Be careful not to overmix. -
Step 4
Divide the dough in half and shape each half into a flat log, about 6-7 inches long. Wrap each log tightly in plastic wrap and chill in the refrigerator for at least 30 minutes. -
Step 5
Preheat oven to 350°F (175°C). Line two baking sheets with parchment paper. Unwrap one dough log at a time and slice into ¼-inch thick rounds. Place slices on prepared baking sheets, leaving space between them. Bake for 10-12 minutes, or until edges are lightly golden brown. Cool cookies completely on a wire rack. -
Step 6
Assemble the ice cream sandwiches: Place one cookie flat-side up, scoop a generous portion of slightly softened vanilla ice cream onto it, and top with a second cookie, flat-side down. Press lightly. -
Step 7
Gently press the sides of each assembled ice cream sandwich into a shallow dish of chopped pistachios, coating the exposed ice cream and cookie edges. -
Step 8
Place the finished ice cream sandwiches on a parchment-lined baking sheet and freeze for at least 1-2 hours, or until the ice cream is firm.
Important Information
Nutrition Facts (Per Serving)
It is important to consider this information as approximate and not to use it as definitive health advice.
Allergy Information
Please check ingredients for potential allergens and consult a health professional if in doubt.