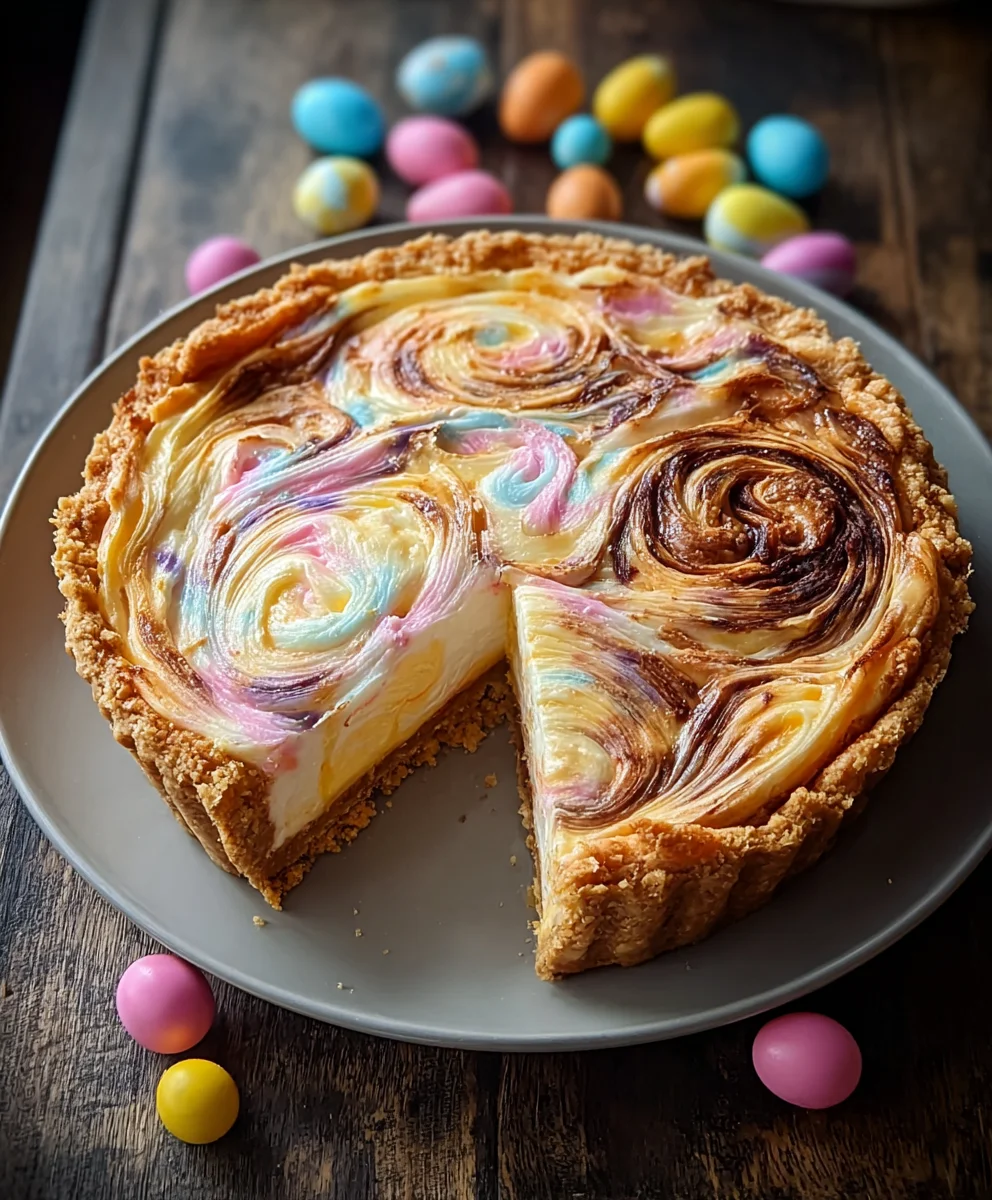
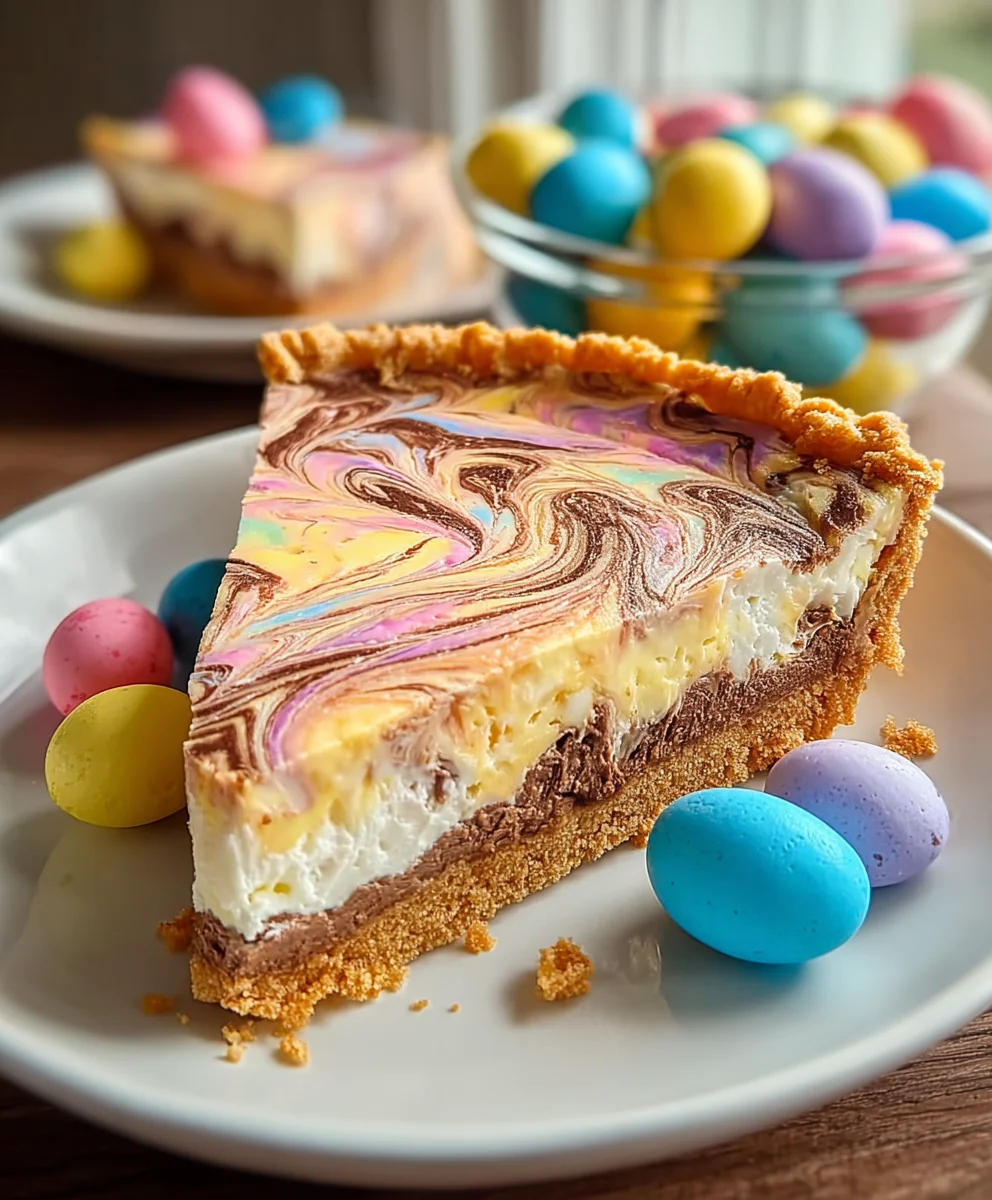
Easter Swirl Pie Recipe – Delicious & Easy Dessert
Easter Swirl Pie Recipe – a delightful masterpiece that encapsulates the very spirit of spring and celebration! If you’ve ever craved a dessert that’s as visually stunning as it is utterly delicious, then look no further. This Easter Swirl Pie Recipe is the perfect centerpiece for your holiday table, guaranteed to elicit gasps of delight from everyone who beholds it. What makes this pie so special? It’s the harmonious dance of textures and flavors: a creamy, dream-like filling swirled with vibrant, seasonal colors, all nestled within a crisp, buttery crust. The anticnon-alcoholic ipation builds with every glance, and the first bite is a revelation – a sweet, tangy, and subtly spiced symphony that lingers long after the last crum extractb is gone. It’s a tradition in the making, a testament to joyful gatherings and the simple pleasure of sharing something truly memorable. Let’s dive into creating this edible work of art together.
Ingredients:
- 2½ cups (250 g) grabeef ham cracker crum extractbs (or vanillarum extractfer crumbs)
- ½ cup (115 g) unsalted butter, melted
- 2 tablespoons granulated sugar
- 8 oz (225 g) cream cheese, softened
- 1 cup (240 ml) heavy whipping cream
- ½ cup (100 g) powdered sugar
- 1 teaspoon vanilla extract
- ½ cup (120 ml) sweetened condensed milk
- Gel food coloring in pastel colors (pink, blue, yellow, purple)
- Whipped cream, for garnish
- Easter-themed sprinkles
- Mini chocolate eggs or pastel candies
Prepare the Crust
- In a medium bowl, combine thbeef harum extractham cracker crumbs, melted unsalted butter, and granulated sugar. Stir everything togetherum extracthoroughly until the crumbs are evenly moistened with the butter. You want the mixture to resemble wet sand. This thorough mixing ensurrum extracta cohesive crust that won’t crumblerum extractart when sliced.
- Press the crumb mixture firmly into the bottom and up the sides of a 9-inch pie plate. You can use the bottom of a measuring curum extractr a flat-bottomed glass to help compact the crumbs evenly. This is crucial for creating a sturdy base for our delicious filling. Make sure to press it in well, especially around the edges, to prevent any leaks.
- Once the crust is pressed, place the pie plate in the freezer for at least 10-15 minutes while you prepare the filling. This chilling step helps the crust set and become firm, which makes it easier to handle and ensures a cleaner slice later on.
Create the Cream Cheese Filling
- In a large bowl, beat the softened cream cheese until it is completely smooth and creamy. It’s important that the cream cheese is truly softened to room temperature, otherwise, you’ll end up with lumps in your filling, which isn’t ideal for a smooth dessert. You can use an electric mixer on medium speed or a sturdy whisk for this task.
- Add the sweetened condensed milk and vanilla extract to the cream cheese. Beat again until well combined and smooth. The sweetened condensed milk adds a wonderful richness and sweetness without making the filling grainy. The vanilla extract enhances all the flavors beautifully.
- In a separate, clean bowl, whip the heavy whipping cream until stiff peaks form. Start on low speed and gradually increase to medium-high. Be careful not to over-whip, as this can turn the cream into butter. Stiff peaks mean that when you lift the whisk, the cream will stand up straight without drooping.
- Gently fold about one-third of the whipped cream into the cream cheese mixture. This lightens the cream cheese base and makes it easier to incorporate the rest of the whipped cream without deflating it. Once partially combined, gently fold in the remaining whipped cream until just combined. Again, be gentle to keep the filling light and airy.
Swirl in the Colors
- Divide the cream cheese filling evenly into four smaller bowls. You’ll want to aim for roughly equal portions in each bowl.
- Add a few drops of a different pastel gel food coloring to each bowl. Start with just a few drops, as gel food coloring is very concentrated. Stir gently in each bowl until the color is incorporated. You can always add more color if you desire a more vibrant hue, but it’s harder to lighten it once it’s too dark. Aim for soft, spring-like pastel shades.
- Now for the fun part: the swirling! Take a spoonful of one color and dollop it into the chilled crust. Then, add a spoonful of another color next to it. Continue alternating colors, dropping dollops of filling randomly around the crust. Don’t worry about being too precise; the more random, the better the swirl effect will be.
- Once all the filling is in the crust, take a skewer or a knife and gently swirl the colors together. Make only a few passes through the filling, moving the skewer in a swirling motion. Avoid over-swirling, as this can cause the colors to blend too much and lose their distinct patterns. You want to see clear swirls and distinct areas of color.
Chill and Garnish
- Carefully cover the pie with plastic wrap, ensuring the wrap doesn’t touch the surface of the filling if possible. Place the pie in the refrigerator to chill for at least 4-6 hours, or preferably overnight. This extended chilling time is essential for the pie to set properly, allowing the flavors to meld and the texture to firm up to perfection. A properly chilled pie will slice beautifully and hold its shape.
- Once the Easter Swirl Pie is fully chilled and set, it’s time for the final flourish. Generously top the pie with whipped cream. You can pipe it on using a pastry bag for a decorative touch or simply spread it evenly with a spatula.
- Decorate the whipped cream with Easter-themed sprinkles, mini chocolate eggs, or pastel candies. Get creative with your designs! This is where you can really make your pie festive and visually stunning for your Easter celebration.
- Slice the chilled pie with a sharp knife, wiping the blade clean between each cut for the neatest slices. Admire the beautiful pastel swirls before serving your delightful Easter creation.
Conclusion:
We hope you’ve enjoyed learning how to create this delightful Easter Swirl Pie Recipe! This visually stunning and incredibly delicious pie is perfect for any spring celebration, especially Easter Sunday. Its vibrant colors and sweet, creamy filling are sure to be a hit with both family and friends. Don’t be intimidated by the swirling; it’s easier than it looks and adds a beautiful, unique touch to every slice. Remember, the key to a perfect swirl is a gentle hand and a toothpick or skewer for artistic flair.
For serving, this Easter Swirl Pie Recipe is fantastic on its own, but it also pairs wonderfully with a dollop of fresh whipped cream or a sprinkle of pastel-colored sprinkles for an extra festive touch. Consider serving it chilled for the ultimate refreshing dessert experience. When it comes to variations, feel free to experiment! You could add a touch of lemon zest to the filling for a brighter flavor, or swap out the food coloring for natural alternatives like beet juice for pink and spinach juice (strained well!) for green.
We encourage you to give this Easter Swirl Pie Recipe a try and make it your own. Baking should be a joy, so have fun with it and savor the process and the delicious outcome. Happy baking and a very happy Easter!
Frequently Asked Questions:
Q: Can I make the crust ahead of time for this Easter Swirl Pie Recipe?
A: Absolutely! You can prepare and bake the pie crust up to a day in advance. Once cooled completely, wrap it tightly in plastic wrap and store it at room temperature. This will save you time on the day of assembly and baking.
Q: My swirls aren’t as defined as I’d like. What am I doing wrong?
A: Achieving defined swirls often comes down to the consistency of your filling and how you introduce the colors. Ensure your filling isn’t too thin. When adding the colored dollops, make sure they are distinct and not too close together. Then, use a toothpick or skewer with swift, light strokes to create the swirls. Avoid over-mixing, as this can blend the colors too much.
Q: Can I use a different type of filling for this Easter Swirl Pie Recipe?
A: While this recipe is designed for a specific creamy filling, you could adapt the concept to other pie fillings. However, you’d need to ensure the filling is firm enough to hold the swirls and that the colors can be incorporated without compromising the texture. A cream cheese-based or cheesecake-style filling would likely be a good alternative.
Easter Swirl Pie Recipe – Delicious & Easy Dessert
A vibrant and delicious Easter Swirl Pie with a graham cracker crust and a creamy, colorful filling, perfect for your spring celebrations.
Ingredients
-
2½ cups (250 g) graham cracker crumbs (or vanilla wafer crumbs)
-
½ cup (115 g) unsalted butter, melted
-
2 tablespoons granulated sugar
-
8 oz (225 g) cream cheese, softened
-
1 cup (240 ml) heavy whipping cream
-
½ cup (100 g) powdered sugar
-
1 teaspoon vanilla extract
-
½ cup (120 ml) sweetened condensed milk
-
Gel food coloring in pastel colors (pink, blue, yellow, purple)
-
Whipped cream, for garnish
-
Easter-themed sprinkles
-
Mini chocolate eggs or pastel candies
Instructions
-
Step 1
Combine graham cracker crumbs, melted butter, and granulated sugar until moistened. Press firmly into a 9-inch pie plate and freeze for 10-15 minutes. -
Step 2
Beat softened cream cheese until smooth. Add sweetened condensed milk and vanilla extract; beat until combined. -
Step 3
Whip heavy cream to stiff peaks. Gently fold about one-third of the whipped cream into the cream cheese mixture, then fold in the remaining whipped cream. -
Step 4
Divide the filling into four bowls. Add a few drops of different pastel gel food coloring to each bowl and stir gently to combine. Add more color if desired. -
Step 5
Dollop spoonfuls of each color randomly into the chilled crust, alternating colors. Use a skewer or knife to gently swirl the colors together with a few passes. Do not over-swirl. -
Step 6
Cover the pie and refrigerate for at least 4-6 hours, or preferably overnight, until set. -
Step 7
Once chilled and set, top with whipped cream and garnish with Easter-themed sprinkles, mini chocolate eggs, or pastel candies. -
Step 8
Slice with a sharp knife, wiping the blade clean between cuts for neat slices. Serve and enjoy!
Important Information
Nutrition Facts (Per Serving)
It is important to consider this information as approximate and not to use it as definitive health advice.
Allergy Information
Please check ingredients for potential allergens and consult a health professional if in doubt.