Easter Bunny Chick Cupcakes-Easy Festive Recipe
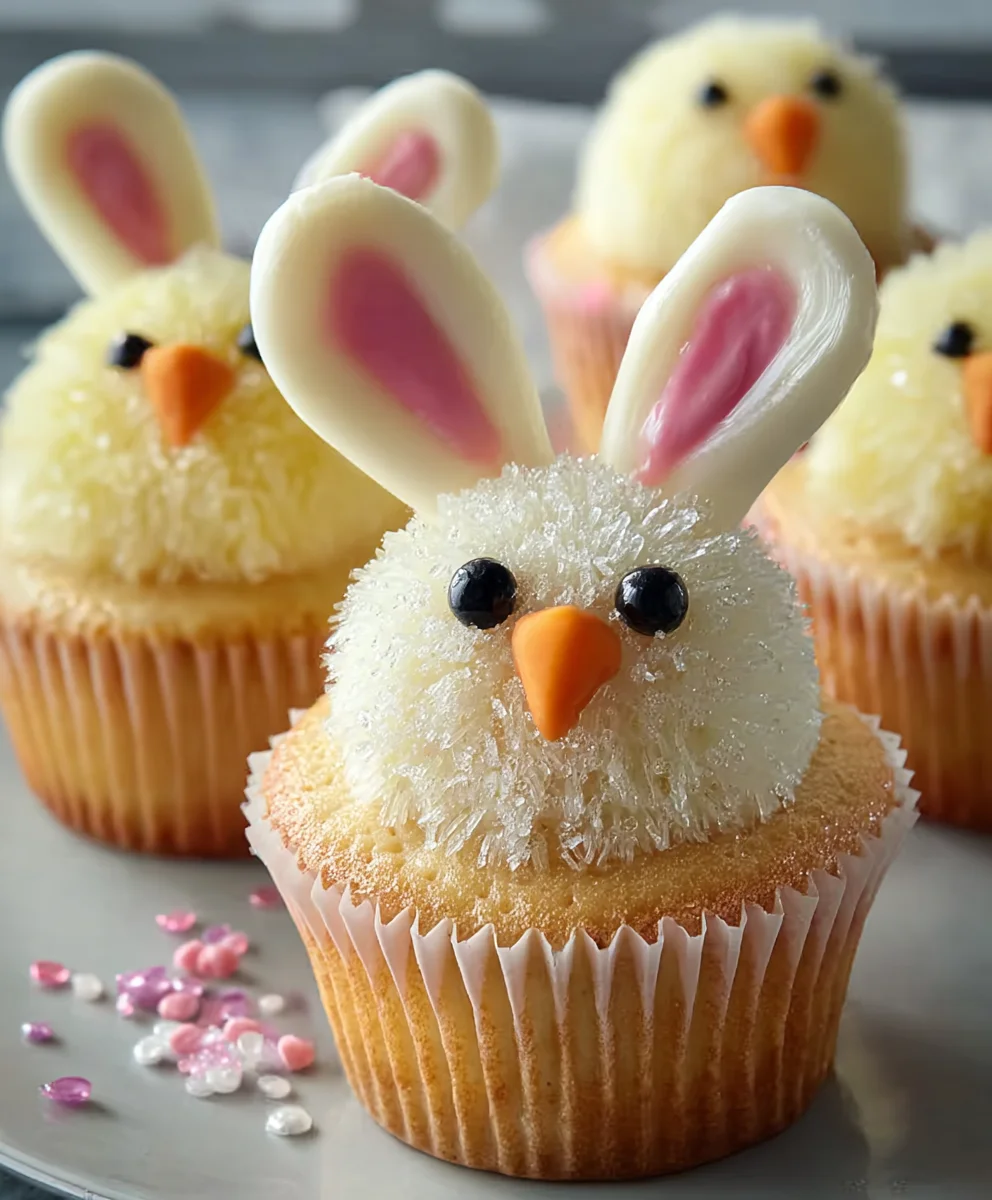
Easter Bunny and Chick Cupcakes are undeniably the stars of any spring celebration, bringin extractg smiles to faces young and old. There’s a certain magic in these adorable creations, transforming a simple treat into a whimsical edible masterpiece. We all love Easter for its promise of renewal, sunshine, and of course, delightful treats, and these charming cupcakes perfectly capture that festive spirit. What makes these particular Easter Bunny and Chick Cupcakes so special? It’s the delightful combination of a perfectly moist cake base, crowned with a swirl of creamy frosting that’s expertly sculpted to resemble the fluffy tails of bunnies or the cheerful fluff of baby chicks. They’re not just desserts; they’re edible decorations, guaranteed to be the talk of your Easter brunch or party. Get ready to impress your loved ones with these incredibly cute and surprisingly easy-to-make festive delights!
Ingredients:
- 1 recipe Vanilla Cupcakes (or your favorite cake mix, prepared according to package directions)
- 1 recipe Fluffy Vanilla Frosting (or enough store-bought frosting to generously frost 12-18 cupcakes)
- Yellow and white sprinkles
- Large and mini marshmallows
- Pink colored sanding sugar
- Black decorator icing
- Jelly beans (specifically pink ones for bunny noses)
- Orange colored gum or M&Ms (for chick beaks)
- Yellow food coloring (for chick frosting)
Preparing Your Cupcakes
Baking the Cupcakes
You’ll start by preparing your cupcakes. If you’re using a cake mix, follow the package instructions precisely for the best results. We want a good, sturdy base for our adorable Easter creations. If you’re making them from scratch with a vanilla recipe, ensure all your ingredients are at room temperature for optimal batter consistency. Bake the cupcakes until a toothpick inserted into the center comes out clean. Overbaking can lead to dry cupcakes, so keep an eye on them as they approach the end of their baking time. Once baked, let them cool in the pans for about 10 minutes before transferring them to a wire rack to cool completely. It’s crucial that the cupcakes are fully cooled before frosting, otherwise, the frosting will melt and slide right off.
Creating the Easter Bunny and Chick Cupcakes
Frosting the Cupcakes
Now for the fun part – decorating! We’ll divide our frosting into two batches. For the bunny cupcakes, we’ll use plain white frosting. For the chick cupcakes, we’ll need to add some vibrant yellow. Take about two-thirds of your prepared frosting and add a few drops of yellow food coloring to it. Mix thoroughly until you achieve a cheerful, consistent yellow shade. You can always add more coloring gradually to get your desired brightness. The remaining one-third of the frosting will be used for the bunnies, so leave it its natural white color.
Assembling the Bunny Cupcakes
To make the bunny faces, we’ll start with the white frosting. Frost each cooled cupcake generously with the white vanilla frosting, creating a smooth, rounded surface. This will be the bunny’s face. Next, take two large marshmallows and cut each one in half horizontally. These will be the bunny’s ears. Gently press the cut side of each marshmallow half into the top of the frosted cupcake, positioning them like bunny ears sticking up. Then, take a pink jelly bean and press it gently into the center of the cupcake, just below the ears, to create the bunny’s nose. For the eyes, use the black decorator icing. With a steady hand, pipe two small dots above the jelly bean nose. You can add a tiny pink sanding sugar sprinkle on top of the jelly bean nose for a little extra sweetness and sparkle.
Assembling the Chick Cupcakes
For our cheerful chicks, we’ll use the yellow-tinted frosting. Frost each of the remaining cooled cupcakes generously with the yellow frosting. Again, aim for a smooth, rounded surface. For the beaks, take your orange colored gum or M&Ms. You might need to cut the gum into small triangular beak shapes, or simply use a whole M&M. Gently press the beak into the top center of the yellow frosted cupcake, just below where the eyes will go. For the eyes, we have a couple of options. You can use the black decorator icing to pipe two small dots, or for a more textured look, use two mini marshmallows with tiny dots of black decorator icing for pupils. Either way, place the eyes slightly above the beak. To add a touch of fluffiness and complete the chick look, sprinkle some yellow and white sprinkles around the edges of the cupcake or on top of the frosting.
Finishing Touches and Decoration Tips
As you assemble both types of cupcakes, don’t be afraid to get creative! For the bunnies, if you want to add a touch of rosy cheeks, you can very lightly dust a little of the pink sanding sugar on either side of the jelly bean nose. For the chicks, ensure the yellow frosting is a vibrant and happy color; you can always add more yellow food coloring if it’s not bright enough. When piping with the black decorator icing, use a fine tip for delicate details like eyes and whiskers (if you’re feeling ambitious for the bunnies!). If you don’t have decorator icing, you can carefully use melted chocolate or even small chocolate chips for eyes. The key is to have fun and let the Easter spirit guide your decorating. These cupcakes are perfect for a festive Easter gathering, a delightful treat for a spring party, or simply a fun activity to do with children. Enjoy the process of bringin extractg these cute characters to life!

Conclusion:
There you have it – your guide to creating adorable and delicious Easter Bunny and Chick Cupcakes! This recipe is a fantastic way to bring some festive cheer to your Easter celebrations, whether you’re hosting a brunch or simply looking for a fun baking project with loved ones. Remember, the joy of baking is in the process, so don’t be afraid to get a little creative with your decorations! These cupcakes are sure to be a hit with guests of all ages, bringin extractg smiles and sweet satisfaction to your Easter table.
For serving, these delightful treats are perfect on their own as a sweet ending to your Easter meal. You can also arrange them on a tiered stand for an impressive centerpiece. Consider pairing them with a glass of milk or a light fruit juice for the little ones, and perhaps a mimosa or sparkling grape juice for the adults.
Don’t hesitate to experiment with variations! You could use different cake flavors like lemon or vanilla bean, or even try a chocolate cake base for a richer taste. Feel free to play with the frosting colors to create a wider variety of bunny and chick characters, or add sprinkles for extra sparkle. The most important thing is to have fun and enjoy the process of making these Easter Bunny and Chick Cupcakes.
Frequently Asked Questions:
Can I make the cupcake batter and frosting ahead of time?
Yes, absolutely! You can bake the cupcakes a day in advance and store them in an airtight container at room temperature. The frosting can also be made a day ahead and stored in the refrigerator. Just be sure to bring it back to room temperature and whip it again before decorating for the best consistency.
What if I don’t have piping bags and tips?
No problem at all! For the frosting, you can use a simple zip-top bag. Snip off a small corner and use it to pipe the frosting onto the cupcakes. For the bunny ears and chick beaks/eyes, you can also use a small spoon to carefully shape the frosting, or even use candy melts or edible markers for finer details.
Easter Bunny Chick Cupcakes-Easy Festive Recipe
Create adorable Easter Bunny and Chick cupcakes with this easy and festive recipe. Perfect for spring parties and family fun!
Ingredients
-
1 recipe Vanilla Cupcakes (or your favorite cake mix, prepared according to package directions)
-
1 recipe Fluffy Vanilla Frosting (or enough store-bought frosting to generously frost 12-18 cupcakes)
-
Yellow and white sprinkles
-
Large and mini marshmallows
-
Pink colored sanding sugar
-
Black decorator icing
-
Jelly beans (specifically pink ones for bunny noses)
-
Orange colored gum or M&Ms (for chick beaks)
-
Yellow food coloring (for chick frosting)
Instructions
-
Step 1
Prepare and bake your cupcakes according to your chosen recipe or cake mix instructions. Ensure they are baked until a toothpick comes out clean and allow them to cool completely on a wire rack. -
Step 2
Divide your frosting into two batches. Add yellow food coloring to about two-thirds of the frosting to create a cheerful yellow for the chicks. Leave the remaining one-third white for the bunnies. -
Step 3
For the bunny cupcakes, frost each cooled cupcake generously with white frosting. Cut two large marshmallows in half horizontally for ears and press them into the top. Add a pink jelly bean for the nose and pipe two small black dots for eyes using decorator icing. -
Step 4
For the chick cupcakes, frost each cooled cupcake generously with yellow frosting. Gently press an orange gum piece (cut into a triangle) or an M&M into the center for the beak. Pipe two black dots for eyes using decorator icing or use mini marshmallows with black icing pupils. -
Step 5
Add finishing touches: sprinkle yellow and white sprinkles on the chick cupcakes for fluffiness. For bunnies, add a tiny pink sanding sugar sprinkle on the nose. Feel free to add pink sanding sugar cheeks to the bunnies or whiskers with the black icing.
Important Information
Nutrition Facts (Per Serving)
It is important to consider this information as approximate and not to use it as definitive health advice.
Allergy Information
Please check ingredients for potential allergens and consult a health professional if in doubt.