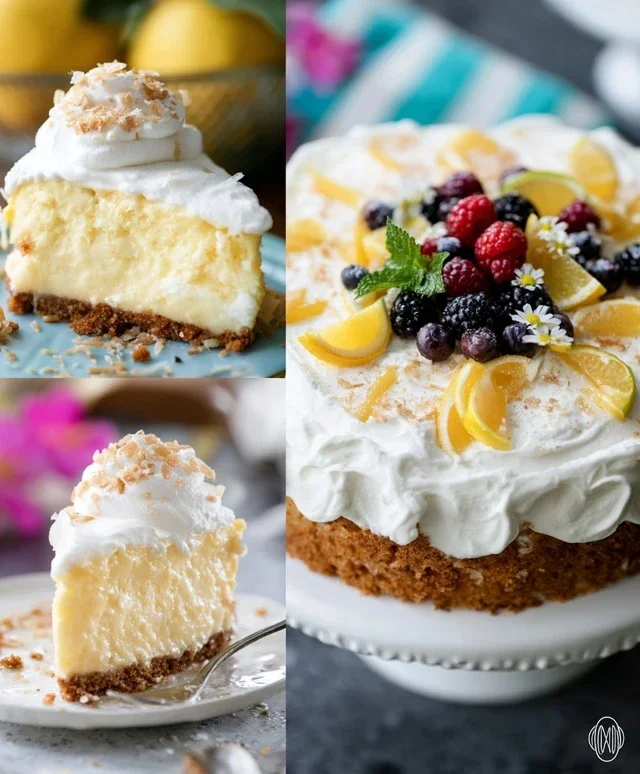
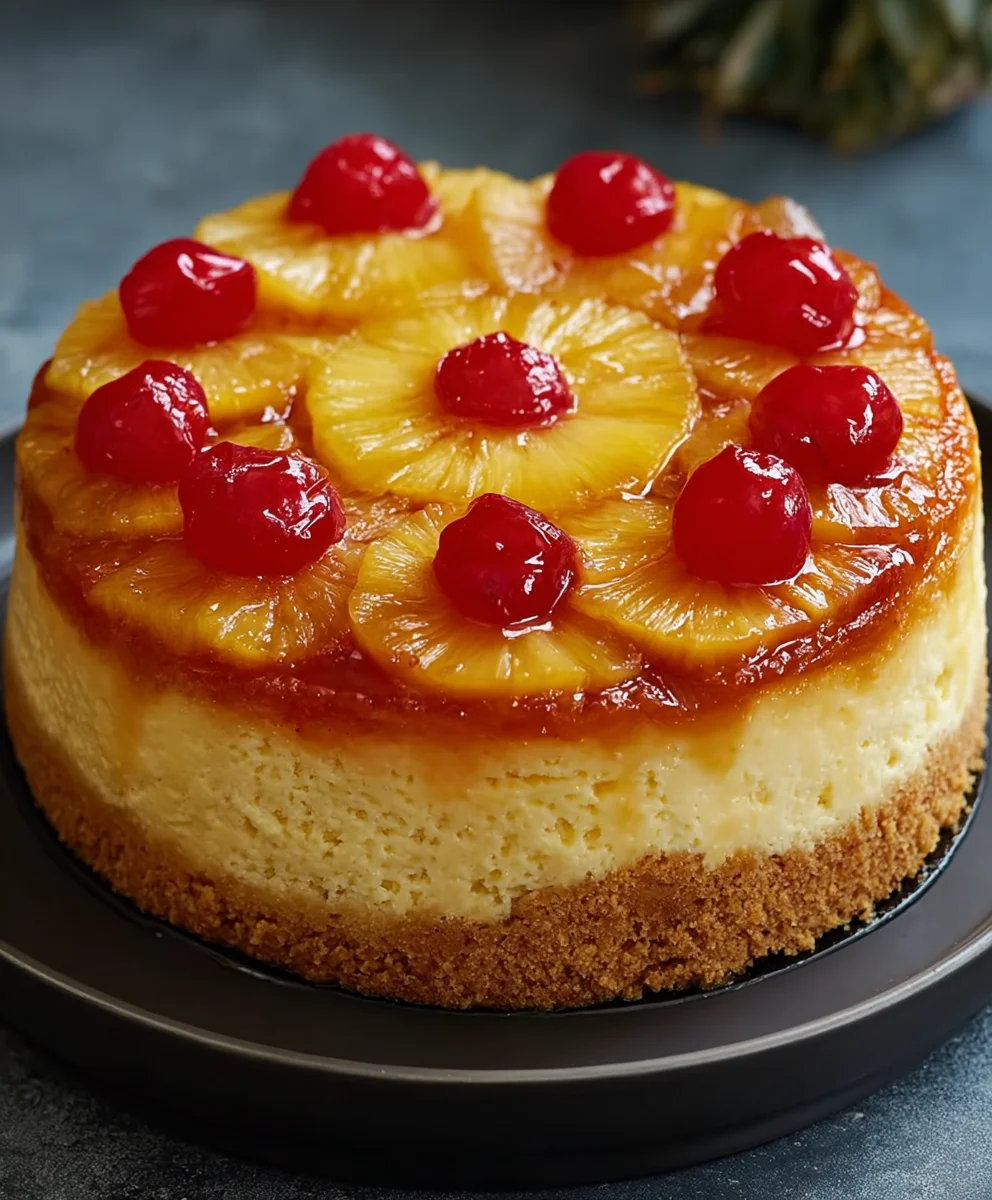
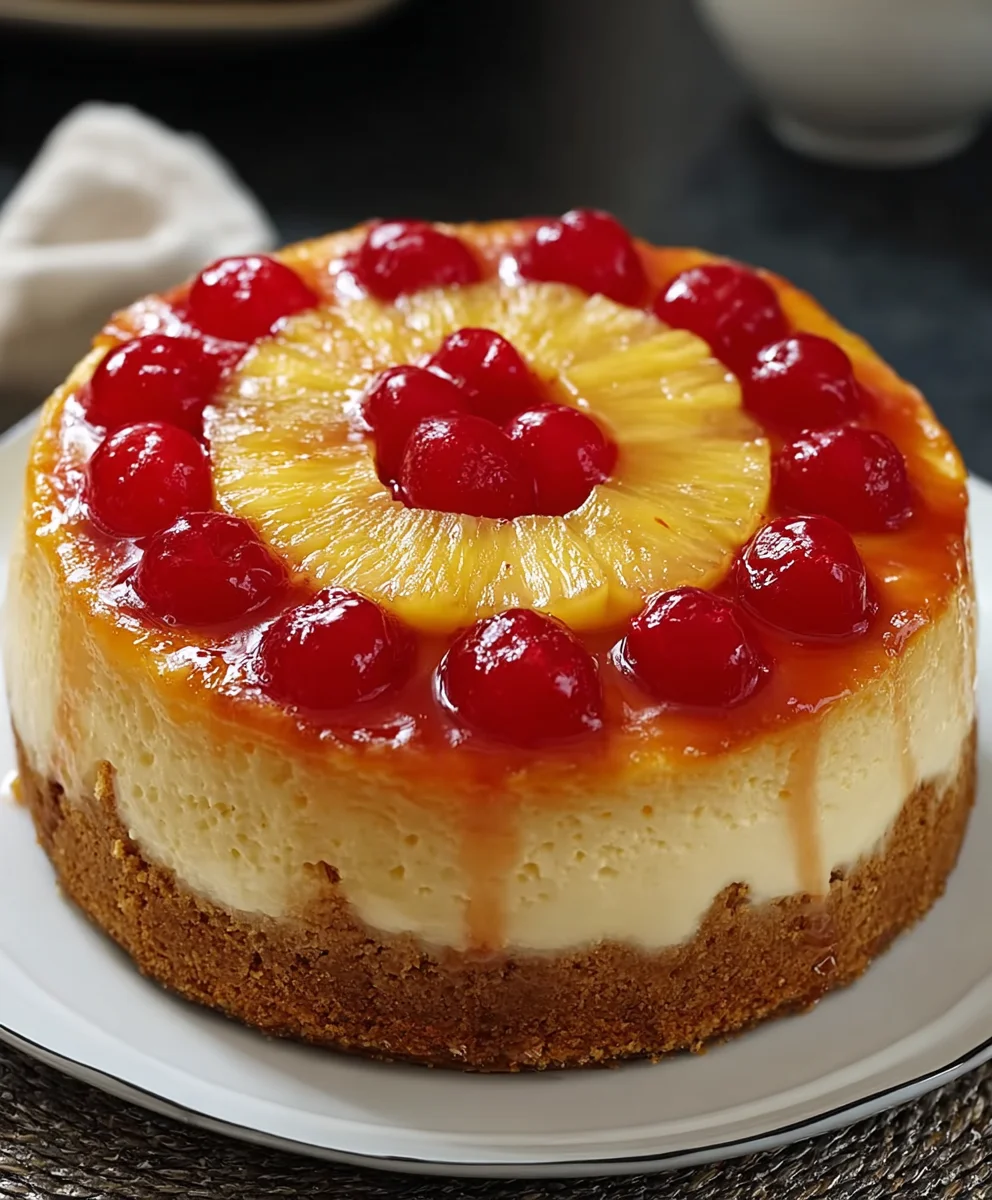
Pineapple Upside-Down Cheesecake Bliss-Easy Dessert
Pineapple Upside-Down Cheesecake Recipe: Prepare to be utterly charmed by a dessert that effortlessly marries the tropical sweetness of pineapple with the creamy indulgence of cheesecake. This Pineapple Upside-Down Cheesecake Recipe isn’t just a dessert; it’s an experience that evokes sunshine, celebration, and pure, unadulterated joy. People absolutely adore this treat because it delivers a delightful surprise with every single bite. The caramelized pineapple, glistening with buttery brown sugar, creates a stunning visual and a burst of tangy-sweet flavor that perfectly complements the rich, smooth cheesecake filling. What truly makes it special is the ingenious inversion – the usually hidden pineapple topping takes center stage, becoming the star of the show. It’s a familiar flavor profile presented in an exciting and unexpected way, making it an unforgettable centerpiece for any occasion, from a casual gathering to a festive birthday. Get ready to impress your taste buds and your guests with this spectacular creation.
Ingredients:
- 1½ cups all-purpose flour
- 1 teaspoon baking powder
- ½ teaspoon baking soda
- ½ teaspoon salt
- ½ cup unsalted butter, softened
- 1 cup granulated sugar
- 2 large eggs
- 1 teaspoon vanilla extract
- ½ cup sour cream
- ½ cup pineapple juice
- ¼ cup brown sugar
- 4 tablespoons unsalted butter
- 6 pineapple rings
- 6 maraschino cherries
- 2 packages (8 oz each) cream cheese, softened
Crust Preparation
Gathering Your Crust Ingredients
To start our delicious Pineapple Upside-Down Cheesecake Recipe, let’s gather the essentials for the buttery, flavorful crust. You’ll need 1½ cups of all-purpose flour, which provides the structural base. For a bit of lift and tenderness, we’ll add 1 teaspoon of baking powder. The ½ teaspoon of baking soda will react with acidic ingredients to create a pleasant texture. Don’t forget the ½ teaspoon of salt to balance the sweetness and enhance all the flavors. For richness and moisture, ½ cup of unsalted butter, softened to room temperature, is crucial. Lastly, ½ cup of granulated sugar will contribute to the sweetness and browning of our crust.
Creating the Crust Mixture
In a medium-sized mixing bowl, whisk together the all-purpose flour, baking powder, baking soda, and salt. This ensures that all the dry ingredients are evenly distributed, which is key for a consistent texture. In a separate large bowl, cream together the softened ½ cup of unsalted butter and ½ cup of granulated sugar until the mixture is light and fluffy. This creaming process incorporates air, which will help make the crust tender. Next, beat in the 2 large eggs, one at a time, ensuring each is fully incorporated before adding the next. Stir in the 1 teaspoon of vanilla extract for that classic sweet aroma and flavor. Gradually add the dry ingredients to the wet ingredients, mixing on low speed or by hand until just combined. Be careful not to overmix at this stage, as it can lead to a tough crust. The dough should be thick and slightly sticky.
Pineapple Topping Assembly
Preparing the Pineapple Layer
Now, let’s prepare the star of our upside-down show: the caramelized pineapple topping. You will need a 9-inch round cake pan or a similarly sized oven-safe skillet for this. In the bottom of your chosen pan, melt 4 tablespoons of unsalted butter. Once melted, sprinkle the ¼ cup of brown sugar evenly over the melted butter. Arrange the 6 pineapple rings on top of the brown sugar and butter mixture. For an extra pop of color and a hint of tartness, place one maraschino cherry in the center of each pineapple ring. This layering creates that beautiful, caramelized glaze that will be on top once the cheesecake is inverted. The combination of butter and brown sugar will caramelize beautifully in the oven, infusing the pineapple with a delightful sweetness.
Cheesecake Filling and Baking
Crafting the Cream Cheese Filling
To achieve that luxuriously smooth and creamy cheesecake texture, we’ll start by beating the softened cream cheese. In a large mixing bowl, beat the 2 packages (8 oz each) of cream cheese until it’s completely smooth and free of lumps. This is a critical step for a silky-smooth filling. Once the cream cheese is smooth, gradually beat in ½ cup of granulated sugar (this is separate from the sugar used in the crust) and the ½ teaspoon of salt, until well combined and creamy. Beat in the 1 teaspoon of vanilla extract. Next, add the ½ cup of sour cream and the ½ cup of pineapple juice, mixing until just incorporated. Do not overmix, as this can introduce too much air, which might cause the cheesecake to crack. The filling should be thick and creamy.
Layering and Baking Instructions
Pour the prepared cream cheese filling evenly over the pineapple and cherry layer in the cake pan. Gently spread the filling to the edges of the pan, ensuring an even distribution. Now, carefully spoon the crust mixture that you prepared earlier over the cream cheese filling. Gently spread the crust mixture to cover the entire surface of the filling, creating a distinct top layer. Place the assembled cheesecake into a preheated oven at 350°F (175°C). Bake for approximately 40-50 minutes, or until the crust is golden brown and the cheesecake filling is set, with only a slight wobble in the center. To prevent the edges from over-browning, you can loosely tent the pan with aluminum foil during the last 10-15 minutes of baking if needed.
Cooling and Inverting
Once the cheesecake is baked, carefully remove it from the oven and let it cool completely on a wire rack. This cooling process is essential for the cheesecake to set properly. It’s also recommended to refrigerate the cheesecake for at least 4-6 hours, or preferably overnight, before inverting. This chilling period allows the flavors to meld and the texture to firm up, making it easier to unmold without breaking. To invert, run a thin knife or offset spatula around the edge of the pan to loosen the cheesecake. Place your serving plate or platter over the top of the cake pan and, with a swift, confident motion, flip the pan and plate over. Carefully lift off the pan. If any pineapple pieces stick to the pan, gently reposition them on the cheesecake.
Conclusion:
There you have it! Your ultimate guide to creating a show-stopping Pineapple Upside-Down Cheesecake Recipe. This dessert beautifully marries the tangy sweetness of pineapple with the rich, creamy indulgence of cheesecake, all topped with a delightfully caramelized crust. It’s a guaranteed crowd-pleaser that’s perfect for any occasion, from casual get-togethers to more elegant celebrations.
For serving, allow the cheesecake to cool completely before slicing. This ensures clean cuts and a perfectly set texture. A dollop of fresh whipped cream or a drizzle of extra caramel sauce makes for an irresistible finish. For variations, consider adding a pinch of cinnamon to the pineapple topping for a warming spice note, or incorporate a hint of coconut extract into the cheesecake batter for a tropical twist.
Don’t be intimidated by its impressive appearance; this Pineapple Upside-Down Cheesecake Recipe is more approachable than you might think. With a little patience and attention to detail, you’ll be rewarded with a truly memorable dessert. So, gather your ingredients, preheat your oven, and get ready to impress yourself and your loved ones!
Frequently Asked Questions:
Can I make this Pineapple Upside-Down Cheesecake Recipe ahead of time?
Absolutely! This cheesecake is best made a day in advance. This allows the flavors to meld beautifully and ensures the cheesecake is fully chilled and set, making it easier to slice and serve. Store it covered in the refrigerator.
What if my pineapple releases too much liquid?
If your pineapple seems excessively juicy, you can drain some of the liquid before adding it to the pan. Alternatively, you can gently pat the pineapple rings dry with a paper towel. This helps prevent the crust from becoming too soggy.
Pineapple Upside-Down Cheesecake Bliss
An easy and delightful Pineapple Upside-Down Cheesecake recipe that combines the rich creaminess of cheesecake with the sweet, caramelized tang of pineapple. Perfect for any occasion!
Ingredients
-
1½ cups all-purpose flour
-
1 teaspoon baking powder
-
½ teaspoon baking soda
-
½ teaspoon salt
-
½ cup unsalted butter, softened
-
1 cup granulated sugar
-
2 large eggs
-
1 teaspoon vanilla extract
-
½ cup sour cream
-
½ cup pineapple juice
-
¼ cup brown sugar
-
4 tablespoons unsalted butter
-
6 pineapple rings
-
6 maraschino cherries
-
2 packages (8 oz each) cream cheese, softened
Instructions
-
Step 1
Prepare the crust: Whisk together flour, baking powder, baking soda, and salt. In a separate bowl, cream softened butter and granulated sugar. Beat in eggs one at a time, then vanilla extract. Gradually add dry ingredients to wet, mixing until just combined. -
Step 2
Assemble the topping: Melt 4 tablespoons of butter in a 9-inch round cake pan. Sprinkle brown sugar evenly over the butter. Arrange pineapple rings and place a maraschino cherry in the center of each. -
Step 3
Make the cheesecake filling: Beat softened cream cheese until smooth. Gradually beat in ½ cup granulated sugar and salt until creamy. Stir in vanilla extract, sour cream, and pineapple juice until just incorporated. Do not overmix. -
Step 4
Layer and bake: Pour the cream cheese filling over the pineapple layer. Carefully spoon the crust mixture over the filling, spreading to cover. Bake at 350°F (175°C) for 40-50 minutes, or until the crust is golden and the center is set. -
Step 5
Cool and invert: Let the cheesecake cool completely on a wire rack. Refrigerate for at least 4-6 hours or overnight. Loosen edges with a knife, place a serving plate on top, and quickly flip to invert.
Important Information
Nutrition Facts (Per Serving)
It is important to consider this information as approximate and not to use it as definitive health advice.
Allergy Information
Please check ingredients for potential allergens and consult a health professional if in doubt.