Sweet Peach Pretzel Salad Dessert Delight
Peach Pretzel Salad Dessert is one of those magical creations that defies categorization and wins hearts with every single bite. Have you ever experienced a dessert that offers a perfect symphony of sweet, salty, and creamy, all in one glorious dish? This isn’t just any dessert; it’s a celebration of textures and flavors that has become a beloved classic for a reason. The unexpected crunch of the pretzel crust, mingling with the sweet, juicy burst of peaches and the cool, tangy cream cheese layer, creates an addiction you won’t regret. It’s the kind of dish that disappears from the potluck table in minutes, leaving everyone clamoring for the recipe. What truly sets this Peach Pretzel Salad Dessert apart is its delightful contrast – the rich, buttery pretzels offering a savory foundation to the bright, summery fruit and velvety filling. It’s comfort food with a sophisticated twist, perfect for any occasion, from casual gatherings to more elegant celebrations.
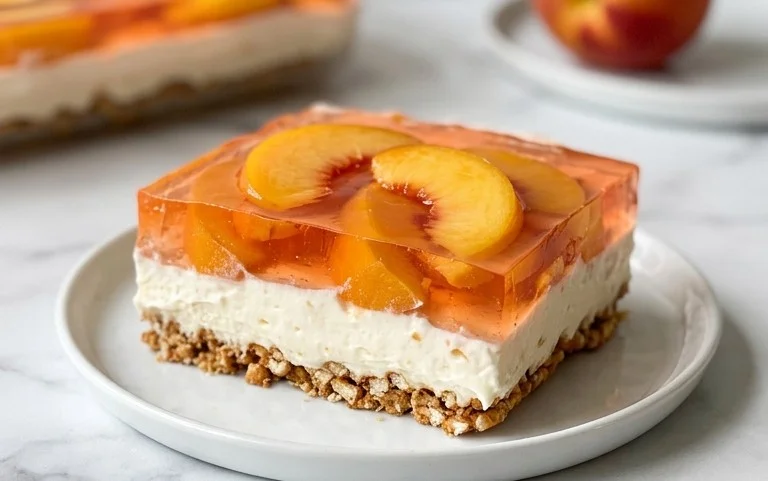
Peach Pretzel Salad Dessert
This Peach Pretzel Salad Dessert is a delightful paradox. While it’s called a “salad,” it’s a sweet, satisfying treat that’s perfect for potlucks, family gatherings, or simply when you’re craving something a little special. The unexpected crunch of pretzels paired with the sweet, fruity layers and creamy topping creates a flavor and texture combination that’s truly addictive. It’s a dessert that brings smiles and second helpings, and surprisingly, it’s not overly complicated to make. Let’s dive into creating this crowd-pleasing dessert!
Ingredients:
Cooking Instructions
This dessert is best assembled in layers, allowing each component to set slightly before adding the next. We’ll start with the pretzel crust, then move on to the creamy filling, and finally, the refreshing peach gelatin layer.
Step 1: Preparing the Pretzel Crust
The foundation of our Peach Pretzel Salad Dessert is a salty-sweet pretzel crust. It’s incredibly easy to make and provides a wonderful contrast to the softer layers above. First, take your 2 1/2 cups of pretzels and crush them. You can do this by placing them in a sturdy zip-top bag and gently crushing them with a rolling pin or the bottom of a heavy pan. Aim for a mix of finer crum extractbs and some slightly larger pieces for texture. In a medium bowl, combine the crushed pretzels with the 3 tablespoons of powdered sugar. The powdered sugar helps to bind the pretzels together and adds a touch of sweetness. Next, pour in the 3/4 cup of melted butter. Stir everything together thoroughly until the pretzel crum extractbs are evenly moistened with the butter. It should resemble wet sand.
Now, take a 9×13 inch baking dish. You can lightly grease it with butter or non-stick spray, though the butter in the crust usually prevents sticking. Pour the pretzel mixture into the prepared baking dish and press it down firmly and evenly to form a compact crust. You can use the bottom of a glass or a flat measuring cup to help achieve a nice, even layer. This crust doesn’t need to be baked; it will set up as the dessert chills. Place this dish in the refrigerator while you prepare the next layer.
Step 2: Crafting the Creamy Filling
This creamy layer is the heart of the dessert, offering a smooth and tangy counterpoint to the crust and fruit. In a medium mixing bowl, add the 8 oz. package of softened cream cheese. It’s important that the cream cheese is softened to room temperature so it will blend smoothly without lumps. To this, add 1 cup of powdered sugar. If you are using the optional pasteurized egg for a richer, more custard-like filling, add it now. Make sure the egg is pasteurized for your safety, especially if you won’t be cooking this layer further. Beat the cream cheese, powdered sugar, and optional egg together until the mixture is light and fluffy. You can use an electric mixer for this, which will make it much easier and achieve a smoother consistency. Scrape down the sides of the bowl as needed to ensure everything is well incorporated.
Once the cream cheese mixture is smooth and airy, gently fold in the 8 oz. carton of thawed whipped topping. Be careful not to overmix at this stage. You want to incorporate the whipped topping without deflating the airiness you’ve created. The goal is a creamy, luscious filling. Spoon this creamy mixture over the chilled pretzel crust in the baking dish. Spread it out evenly, covering the entire surface of the pretzel layer. Return the dish to the refrigerator for at least 15-20 minutes to allow this layer to firm up slightly before adding the gelatin.
Step 3: Dissolving the Peach Gelatin
Now for the vibrant, fruity layer! In a heatproof bowl, combine the 6 oz. box of peach gelatin with 2 1/3 cups of boiling water. It’s crucial to use boiling water here as it’s essential for properly dissolving the gelatin. Stir the mixture continuously until all the gelatin granules are completely dissolved. You shouldn’t see any undissolved powder at the bottom of the bowl. This usually takes a few minutes of stirring.
Once the gelatin is fully dissolved, it’s time to add the peaches. Gently stir in the 4 cups of sliced peaches. If you’re using canned peaches, make sure they are well-drained to avoid watering down the gelatin. If you’re using fresh peaches, you can slice them yourself, ensuring they are ripe for the best flavor. Allow this mixture to cool to room temperature. This step is important because if you pour hot gelatin over the cream cheese layer, it can melt the cream cheese and create a messy separation. Cooling it to room temperature allows it to thicken slightly on its own before it’s combined with the other layers.
Step 4: Assembling the Final Layers
Once the gelatin and peach mixture has cooled to room temperature, carefully spoon it over the chilled cream cheese layer in the 9×13 inch dish. Work gently to avoid disturbing the cream cheese layer underneath. Spread the gelatin evenly over the cream cheese, ensuring complete coverage. At this point, the dessert might look almost complete, but it needs time to set properly.
Cover the baking dish tightly with plastic wrap. It’s best to place it in the refrigerator and let it chill for at least 4-6 hours, or preferably overnight. This extended chilling time is essential for the gelatin to fully set and for all the flavors to meld together beautifully. The longer it chills, the firmer and more delicious it will become.
Step 5: Serving Your Masterpiece
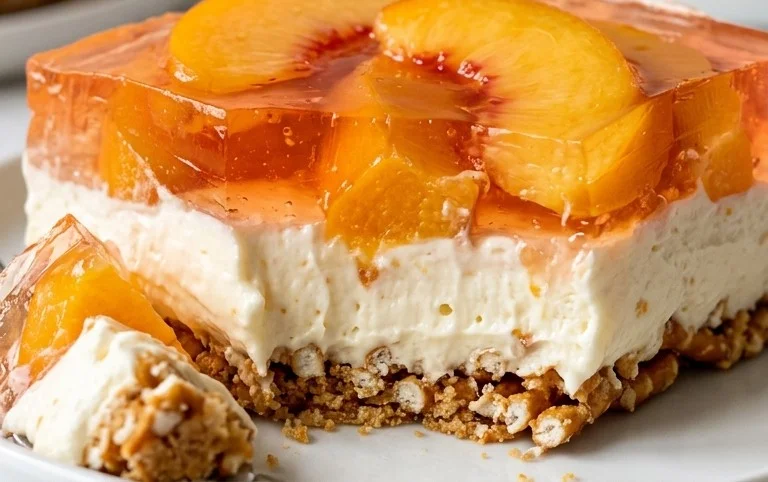
Once your Peach Pretzel Salad Dessert has chilled and set beautifully, it’s ready to be served! When you’re ready to enjoy, simply cut it into squares. The layers should be distinct and hold their shape nicely. The salty crunch of the pretzel crust, the smooth and creamy filling, and the sweet, tender peaches suspended in the wobbly gelatin create a truly delightful experience. This dessert is always a hit, and you’ll likely find yourself asked for the recipe! It’s a testament to how simple ingredients can come together to create something truly memorable and delicious. Enjoy every refreshing bite!
Conclusion:
I hope you’re as excited to try this Peach Pretzel Salad Dessert as I am to have shared it with you! This recipe truly hits all the right notes for a crowd-pleasing dessert. It masterfully balances the sweet, juicy goodness of peaches with the salty, crunchy texture of pretzels, all brought together by a delightful creamy layer. It’s surprisingly easy to make, which is always a win in my book, and the visual appeal is undeniable. Imagin extracte serving this vibrant dish at your next potluck, barbecue, or family gathering – it’s guaranteed to be a hit and leave everyone asking for the recipe!
For serving, I love cutting it into generous squares and enjoying it chilled. It’s perfect on its own, but you could also add a dollop of whipped cream or a sprinkle of extra crushed pretzels for added indulgence. Feeling adventurous? Consider adding a touch of cinnamon to the pretzel crust or swapping out the peaches for another stone fruit like apricots or plums during their peak season. The possibilities are endless!
Don’t hesitate to give this Peach Pretzel Salad Dessert a try. It’s a truly special treat that offers a unique flavor and texture experience. I’m confident you’ll fall in love with its simple elegance and unforgettable taste!
Frequently Asked Questions about Peach Pretzel Salad Dessert:
Can I make this dessert ahead of time?
Absolutely! This Peach Pretzel Salad Dessert is actually best made a few hours in advance, or even the day before. This allows the flavors to meld together beautifully and ensures the pretzel crust has enough time to soften slightly while still retaining some of its delightful crunch. Just keep it covered and refrigerated until you’re ready to serve.
What if I don’t have fresh peaches?
No worries! You can definitely use canned or frozen peaches. If using canned, make sure to drain them very well to avoid a watery dessert. If using frozen, thaw them completely and drain any excess liquid before incorporating them into the salad. The flavor might be slightly different, but it will still be delicious!
Peach Pretzel Salad Dessert
A delightful layered dessert featuring a crunchy pretzel crust, a creamy cream cheese filling, and a sweet peach gelatin layer.
Ingredients
-
2 1/3 c. boiling water
-
1 6 oz. box peach gelatin
-
4 c. sliced peaches (fresh or canned)
-
2 1/2 c. crushed pretzels
-
3 Tbsp. powdered sugar
-
3/4 c. melted butter
-
1 8 oz. package cream cheese
-
1 c. powdered sugar
-
1 8 oz. carton whipped topping
-
1 pasteurized egg (OPTIONAL)
Instructions
-
Step 1
For the crust: Combine crushed pretzels, 3 Tbsp. powdered sugar, and melted butter. Press into the bottom of a 9×13 inch baking dish. -
Step 2
Prepare the gelatin: Dissolve peach gelatin in boiling water. Stir in sliced peaches and set aside to slightly thicken. -
Step 3
Make the cream cheese layer: Beat cream cheese with 1 c. powdered sugar until smooth. Gently fold in whipped topping and the optional pasteurized egg. -
Step 4
Assemble the dessert: Spread the cream cheese mixture evenly over the pretzel crust. -
Step 5
Pour the peach gelatin mixture over the cream cheese layer. -
Step 6
Chill for at least 4 hours, or until set. Cut into squares and serve.
Important Information
Nutrition Facts (Per Serving)
It is important to consider this information as approximate and not to use it as definitive health advice.
Allergy Information
Please check ingredients for potential allergens and consult a health professional if in doubt.