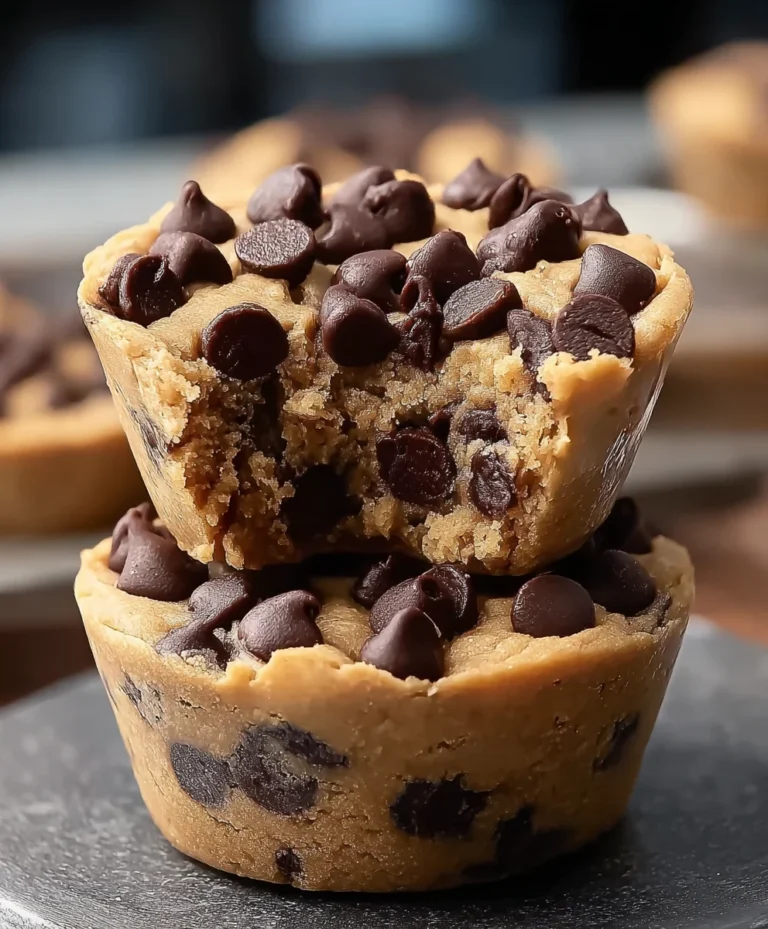
Cadbury Egg Kiss Cookies- Irresistible Chocolate-Kissed Delights
Cadbury Egg Kiss Cookies are about to become your new springtime obsession, and I can’t wait to share this delightful recipe with you! There’s something truly magical about these little bites that captures the spirit of the season. They’re a playful twist on a classic cookie, infused with the unmistakable, creamy goodness of Cadbury mini chocolate eggs. Everyone knows how much joy those iconic purple wrappers hold, and tucking them into a tender, buttery cookie creates an experience that’s simply irresistible. What makes these Cadbury Egg Kiss Cookies so special is the perfect balance of textures: the slightly crisp edges giving way to a soft, chewy center, all punctuated by the delightful, melty surprise of a Cadbury egg. They’re ideal for Easter gatherings, a sweet afternoon treat, or simply when you need a little burst of chocolatey happiness.
Get Ready to Bake Some Joy!
These Cadbury Egg Kiss Cookies are a dream.

Cadbury Egg Kiss Cookies
Get ready to fall in love with these delightful Cadbury Egg Kiss Cookies! These cookies are the perfect fusion of classic peanut butter goodness and the irresistible creamy, chocolatey crunch of Cadbury Mini Eggs. They’re surprisingly easy to make and are guaranteed to be a huge hit at any gathering, or simply for a sweet treat to brighten your day. The combination of soft, chewy peanut butter cookie with those iconic, pastel-speckled Cadbury eggs nestled within is truly magical. I’ve always been a fan of peanut butter cookies, but adding the festive Cadbury eggs elevates them to a whole new level of deliciousness, especially around Easter, but honestly, they’re fantastic any time of year! The sweet, slightly malty chocolate shell of the Cadbury egg melts just enough to create a wonderful gooey surprise in the center of the cookie. Let’s get baking!
Ingredients:
Cookie Dough Preparation
The foundation of these delicious cookies is a classic peanut butter cookie dough. It’s important to ensure your butter is truly softened, not melted. This means it should yield easily to a gentle press with your finger. If your butter is too cold, it won’t cream properly with the sugars, leading to a denser cookie. For the sugars, using both granulated and light brown sugar is key. The granulated sugar provides structure, while the light brown sugar adds moisture and that delightful chegrape juicess thanks to the molasses content. Creaming these together with the softened butter until light and fluffy is a crucial step. This process incorporates air into the dough, which will help the cookies rise and become tender.
Next, we’ll incorporate the creamy peanut butter. Make sure you’re using creamy, not chunky, for the best texture. Stir this in until it’s well combined with the butter and sugar mixture. Then, crack in your large egg and add the vanilla extract. Beat until everything is smooth and well incorporated. This wet ingredient base is what will give our cookies their rich flavor and soft texture.
Now it’s time for the dry ingredients. In a separate medium bowl, whisk together the all-purpose flour, baking soda, and salt. The baking soda is essential for leavening, helping the cookies spread and become light. The salt balances the sweetness and enhances the overall flavor of the peanut butter. Gradually add the dry ingredients to the wet ingredients, mixing on low speed or by hand just until combined. Be careful not to overmix at this stage, as overmixing can develop the gluten in the flour, resulting in tough cookies. We want a tender, slightly soft dough.
Forming and Adorning the Cookies
Once your dough is ready, it’s time to form the cookies and add our star ingredient – the Cadbury Mini Eggs! First, in a small shallow dish or plate, place the 1/4 cup of granulated sugar that’s reserved for rolling. This sugar coating gives the cookies a lovely crisp exterior and adds a touch more sweetness.
Now, take about one tablespoon of the cookie dough and roll it into a ball. Roll each ball in the granulated sugar until it’s evenly coated. Place the sugared cookie dough balls about two inches apart on a baking sheet lined with parchment paper. Parchment paper is a lifesaver here, as it prevents sticking and makes for easy cleanup.
This is where the magic happens. Gently press one Cadbury Mini Egg into the top of each cookie dough ball. You can press it in just enough so it feels secure. Don’t worry if the egg sinks in a bit; it will settle further during baking. I like to position them so they are slightly visible, giving a hint of the delicious surprise inside. You’ll need approximately 30 mini eggs for this recipe, so try to distribute them evenly. If you have any leftover dough or eggs, you can always make a few extra cookies!
Baking and Cooling
Baking Instructions
Preheat your oven to 350°F (175°C). This is a standard temperature for many cookie recipes and ensures even baking. Place your prepared baking sheets in the preheated oven.
Bake for 9 to 12 minutes, or until the edges of the cookies are lightly golden brown and the centers still look slightly soft. It’s crucial not to overbake them! The cookies will continue to set as they cool on the baking sheet. If you bake them until they appear completely firm in the oven, they might end up dry and crum extractbly. Keep a close eye on them during the last few minutes of baking. The Cadbury Mini Eggs will soften and slightly melt, creating a beautiful, gooey center.
Cooling the Cookies
Once the baking time is up, carefully remove the baking sheets from the oven. Allow the cookies to cool on the baking sheets for about 5 minutes. This resting period is important because the cookies are still quite delicate and will firm up a bit, making them easier to transfer without breaking. After this initial cooling period, use a spatula to carefully transfer the cookies to a wire rack to cool completely. Cooling completely on a wire rack allows air to circulate around the cookies, preventing them from becoming soggy on the bottom. Once they are completely cool, they are ready to be enjoyed! These Cadbury Egg Kiss Cookies are best enjoyed within a few days of baking and can be stored in an airtight container at room temperature. Happy baking!

Conclusion:
I hope you’re as excited to try these Cadbury Egg Kiss Cookies as I am! These delightful little treats are the perfect blend of chewy cookie goodness and the irresistible creamy, chocolatey center of a Cadbury Mini Egg. They’re surprisingly easy to whip up, making them a fantastic option for a quick indulgence, a fun baking project with the family, or a show-stopping addition to any cookie platter. The rich, buttery cookie dough perfectly complements the sweet Cadbury chocolate, creating a flavor combination that’s simply divine. Whether you’re a seasoned baker or just starting out, you’ll find this recipe incredibly rewarding and delicious.
For serving, these cookies are wonderful on their own with a glass of milk or a cup of coffee. They also make a fantastic dessert after a hearty meal or can be packed into tins for thoughtful homemade gifts. If you’re looking to get creative, consider rolling the cookie dough balls in sprinkles before baking for an extra pop of color, or perhaps adding a touch of peppermint extract to the dough for a festive twist. Don’t be afraid to experiment! I truly encourage you to give these Cadbury Egg Kiss Cookies a try; I’m confident you’ll fall in love with them.
Frequently Asked Questions about Cadbury Egg Kiss Cookies:
Can I use different types of Cadbury chocolate eggs?
While the classic Cadbury Mini Egg is what makes these cookies so special, you could experiment with other Cadbury-sized chocolate pieces. However, keep in mind that different chocolates may melt at slightly different rates, which could affect the final texture and appearance. Cadbury Mini Eggs are ideal due to their thin candy shell and creamy milk chocolate center.
How should I store these cookies?
Once cooled completely, store your Cadbury Egg Kiss Cookies in an airtight container at room temperature for up to 3-4 days. They tend to stay delightfully chewy when stored properly, though the chocolate center might soften slightly in warmer conditions.
My chocolate center leaked out, what did I do wrong?
This can sometimes happen if the cookie dough isn’t wrapped tightly enough around the Cadbury Egg, or if the cookie is overbaked. Ensure you’re generously covering the egg with dough and try to bake them just until the edges are golden brown, rather than baking until the entire cookie is deeply colored. Chilling the dough balls for a short period before baking can also help them hold their shape better.
Cadbury Egg Kiss Cookies
Delightful peanut butter cookies topped with a festive Cadbury Mini Egg, perfect for Easter or any celebration.
Ingredients
-
1/2 cup (1 stick) butter, softened
-
1/2 cup granulated sugar
-
1/2 cup light brown sugar
-
1/2 cup creamy peanut butter
-
1 large egg
-
1/2 teaspoon vanilla extract
-
2 cups all-purpose flour
-
1/2 teaspoon baking soda
-
1/4 teaspoon salt
-
1/4 cup granulated sugar (for rolling)
-
30 Cadbury Mini Eggs
Instructions
-
Step 1
Preheat oven to 350°F (175°C). Line baking sheets with parchment paper. -
Step 2
In a large bowl, cream together the softened butter, granulated sugar, and light brown sugar until light and fluffy. -
Step 3
Beat in the creamy peanut butter, large egg, and vanilla extract until well combined. -
Step 4
In a separate bowl, whisk together the all-purpose flour, baking soda, and salt. Gradually add the dry ingredients to the wet ingredients, mixing until just combined. -
Step 5
Roll the dough into 1-inch balls and then roll each ball in the reserved 1/4 cup granulated sugar. Place cookies 2 inches apart on the prepared baking sheets. -
Step 6
Gently press one Cadbury Mini Egg into the center of each cookie dough ball before baking. -
Step 7
Bake for 8-10 minutes, or until the edges are lightly golden brown. The centers should still look slightly soft. -
Step 8
Let cookies cool on the baking sheets for a few minutes before transferring them to a wire rack to cool completely. The Cadbury Egg will soften slightly but should hold its shape.
Important Information
Nutrition Facts (Per Serving)
It is important to consider this information as approximate and not to use it as definitive health advice.
Allergy Information
Please check ingredients for potential allergens and consult a health professional if in doubt.