Viral Chicken Crust Caesar Salad Pizza Recipe
Viral Chicken Crust Caesar Salad Pizza is the dish that’s taken the internet by storm, and for good reason! Imagin extracte your favorite creamy, tangy Caesar salad transformed into an irresistible pizza, but with a genius twist: a crispy, savory chicken crust instead of traditional dough. This innovative creation has captured our hearts (and taste buds) because it brilliantly merges comfort food with a lighter, protein-packed alternative. It’s the ultimate guilt-free indulgence, offering that satisfying crunch and all the beloved flavors of a classic Caesar salad without the heavy carbs. Get ready to discover why this Viral Chicken Crust Caesar Salad Pizza is a game-changer for pizza night and a guaranteed crowd-pleaser.
Viral Chicken Crust Caesar Salad Pizza
Hey there, fellow food lovers! If you’ve been scrolling through your social media feeds lately, chances are you’ve stumbled upon the mesmerizing world of the “chicken crust Caesar salad pizza.” This dish is an absolute game-changer, a brilliant fusion that takes the creamy, tangy goodness of a Caesar salad and the satisfying crunch of a pizza crust, all while ditching the traditional dough. Instead, we’re using seasoned, finely minced chicken as our base, baking it into a sturdy yet tender crust that’s absolutely perfect for piling high with all your favorite Caesar salad toppings. It’s keto-friendly, gluten-free, and ridiculously delicious. I’ve been experimenting with it in my own kitchen, and let me tell you, it’s a winner. Get ready to impress yourself and anyone you share this with!
Ingredients:
Cooking Instructions
The magic of this pizza starts with creating that incredible chicken crust. It’s surprisingly simple and comes together really quickly.
Preparing the Chicken Crust
1. Preheat Your Oven and Prep Your Baking Sheet: First things first, let’s get our oven warmed up. I like to preheat mine to 400°F (200°C). While the oven is heating, grab a large baking sheet. To prevent any sticking and make cleanup a breeze, I highly recommend lining it with parchment paper or a silicone baking mat. This is crucial for getting that crust to lift off cleanly later. If you don’t have parchment, you can lightly grease the baking sheet, but parchment is definitely the way to go for the best results.
2. Mix the Chicken Crust Ingredients: In a medium-sized mixing bowl, combine the 1.5 pounds of ground chicken. To this, add the 1/2 cup of grated Parmesan cheese – this is what helps bind everything together and adds a lovely cheesy flavor. Crack in the large egg; this acts as another binder. Now, let’s season it up! Sprinkle in the garlic powder, onion powder, dried oregano, black pepper, and a pinch of salt. Don’t be shy with the seasonings; they’re what will make your chicken crust taste amazing. Use your hands to thoroughly mix all the ingredients together. You want to ensure everything is evenly distributed, so there are no pockets of plain chicken or cheese. It should form a cohesive mixture that you can easily shape.
3. Shape the Chicken Crust: Now for the fun part – shaping our pizza base! Take the mixed chicken and place it onto your prepared baking sheet. Using your hands, spread the chicken mixture out into a circular pizza shape. Aim for a thickness of about 1/4 to 1/2 inch. It’s important not to make it too thin, or it might become dry, but also not too thick, or it might not cook through evenly. Try to get the edges slightly thicker than the center, mimicking a traditional pizza crust. This will help create a nice edge that holds the toppings well. You can use the back of a spoon or a spatula to smooth out the surface, making it as even as possible for consistent baking.
4. Pre-Bake the Chicken Crust: This is a vital step to ensure your chicken crust is cooked through and has a nice, firm texture before we add the toppings. Carefully place the baking sheet into your preheated oven. Let it bake for about 15-20 minutes. You’ll know it’s ready when the chicken is cooked through and starting to turn golden brown around the edges. The surface should be firm to the touch. During this time, the chicken will release some moisture, which is normal. You can carefully drain any excess liquid if you prefer, but it’s usually not necessary.
Assembling and Finishing the Pizza
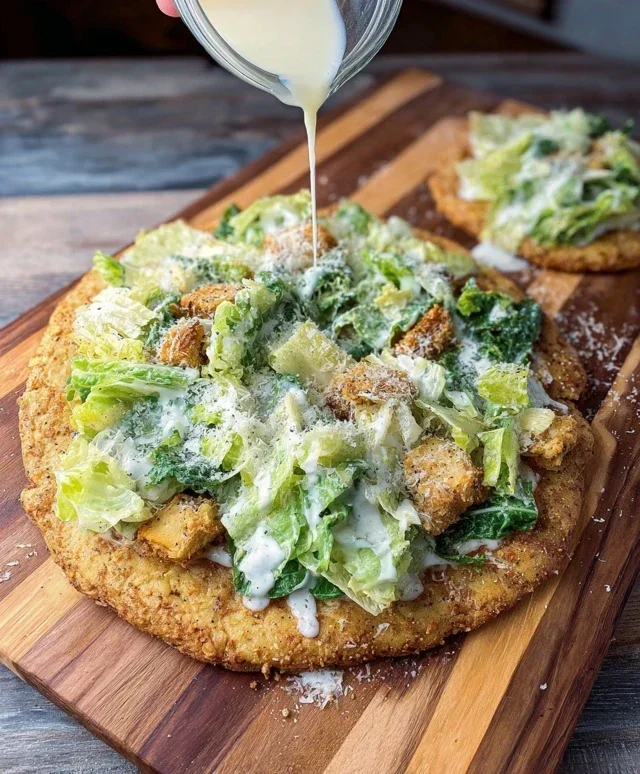
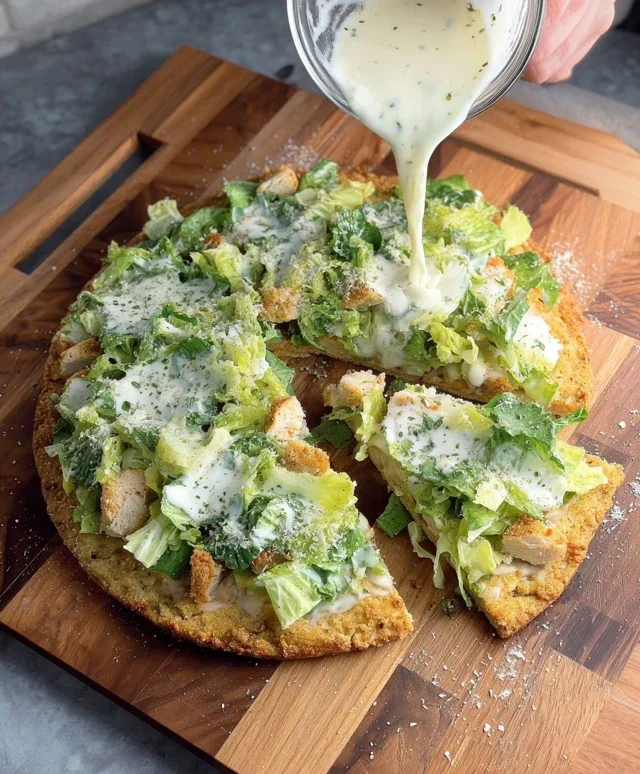
5. Add the Caesar Toppings: Once your chicken crust is pre-baked and out of the oven, it’s time to transform it into a Caesar salad masterpiece! In a separate bowl, toss your chopped romaine lettuce with the 1/2 cup of Caesar dressing until it’s well coated. You want just enough dressing to coat the leaves, not drench them. Spread this dressed lettuce evenly over the pre-baked chicken crust. Don’t overload it too much at this stage, as the lettuce will wilt slightly when it goes back into the oven. Then, scatter the chopped or shredded cooked chicken breast over the lettuce, followed by the halved cherry tomatoes and thinly sliced red onion. Finally, sprinkle the remaining 1/4 cup of shredded Parmesan cheese over everything. If you’re a fan of extra crunch, this is also the time to add your croutons – just be aware they might soften a bit in the oven.
6. Final Bake and Serve: Return the assembled pizza to the oven for another 5-7 minutes, or until the cheese is melted and bubbly and the lettuce is slightly wilted. Keep an eye on it to prevent the edges from burning. Once it’s out of the oven, let it cool for a minute or two before slicing. This allows the toppings to set and makes it easier to cut. Serve immediately and enjoy this incredibly satisfying, low-carb twist on a classic!
Conclusion:
Well, there you have it – the ultimate guide to creating your very own Viral Chicken Crust Caesar Salad Pizza! This recipe truly is a game-changer, offering a satisfyingly crispy chicken crust that provides a fantastic protein boost while eliminating traditional pizza dough. The creamy Caesar dressing, fresh romaine, crunchy croutons, and savory grilled chicken come together in a symphony of flavors and textures that will leave you utterly delighted. It’s a healthier, more exciting take on a beloved classic, perfect for a weeknight dinner or a fun gathering.
I highly recommend serving this masterpiece cut into wedges, just like any other pizza. It’s fantastic as a standalone meal, or you can pair it with a light side salad or some roasted vegetables for a complete and balanced feast. Don’t be afraid to get creative with variations! Consider adding sun-dried tomatoes for a burst of sweetness, or perhaps some red onion for a bit of bite. For those who love a little heat, a sprinkle of chili flakes would be divine. The possibilities are endless, and the beauty of this chicken crust Caesar salad pizza lies in its adaptability.
I truly encourage you to give this recipe a try. It’s surprisingly simple to make, incredibly rewarding, and a guaranteed crowd-pleaser. Get ready to impress yourself and everyone lucky enough to share a slice!
Frequently Asked Questions:
Can I make the chicken crust ahead of time?
Yes, you absolutely can! You can prepare the chicken crust up to a day in advance and store it in the refrigerator. Just ensure it’s well-covered. You might need to bake it a minute or two longer to ensure it’s fully heated through and crispy when you add the toppings.
What if I don’t have grilled chicken? Can I use rotisserie chicken?
Absolutely! Rotisserie chicken is a fantastic and convenient alternative to grilled chicken for this recipe. Just shred or dice it and toss it with your Caesar dressing before adding it to the pizza. It will be just as delicious!
Is there a vegetarian option for this pizza?
While the chicken crust is a key component of this specific recipe, you could adapt the concept. For a vegetarian twist, you might consider a “crust” made from a thick layer of seasoned cauliflower or even a portobello mushroom cap, topped with your Caesar salad fixings. However, for this viral chicken crust Caesar salad pizza, chicken is the star!
Viral Chicken Crust Caesar Salad Pizza
A viral sensation, this pizza features a crispy chicken crust topped with classic Caesar salad ingredients. A healthier and delicious twist on a favorite.
Ingredients
-
1 pound ground chicken
-
1/4 cup grated Parmesan cheese
-
1 teaspoon garlic powder
-
1 teaspoon Italian seasoning
-
1/2 cup shredded romaine lettuce
-
1/4 cup croutons
-
2 tablespoons Caesar dressing
-
2 tablespoons shaved Parmesan cheese
-
1 tablespoon chopped fresh parsley
Instructions
-
Step 1
Preheat oven to 400°F (200°C). Line a baking sheet with parchment paper. -
Step 2
In a bowl, combine ground chicken, 1/4 cup Parmesan cheese, garlic powder, and Italian seasoning. Mix well. -
Step 3
Press the chicken mixture onto the prepared baking sheet to form a pizza crust shape, about 1/4 inch thick. -
Step 4
Bake the chicken crust for 15-20 minutes, or until cooked through and lightly golden. Drain any excess fat. -
Step 5
In a separate bowl, toss the shredded romaine lettuce and croutons with Caesar dressing. -
Step 6
Top the baked chicken crust with the Caesar salad mixture. Sprinkle with shaved Parmesan cheese and fresh parsley. -
Step 7
Serve immediately.
Important Information
Nutrition Facts (Per Serving)
It is important to consider this information as approximate and not to use it as definitive health advice.
Allergy Information
Please check ingredients for potential allergens and consult a health professional if in doubt.