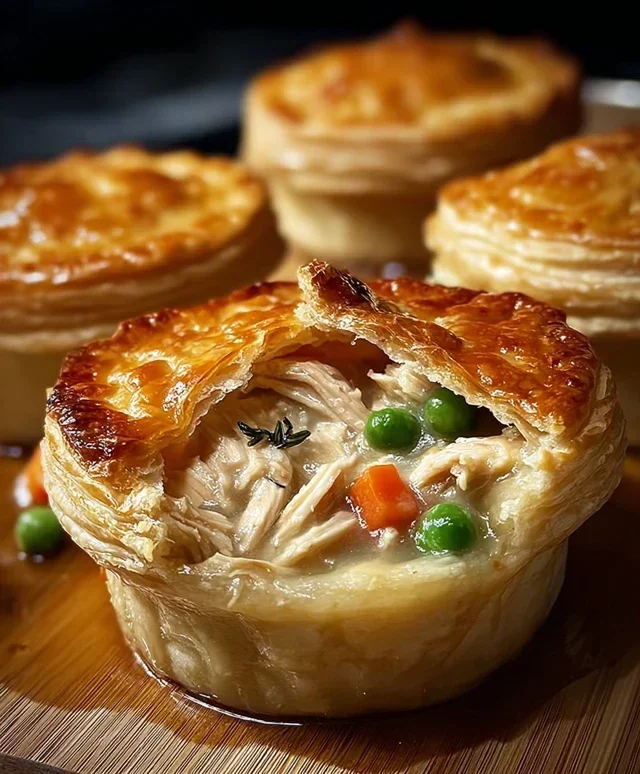
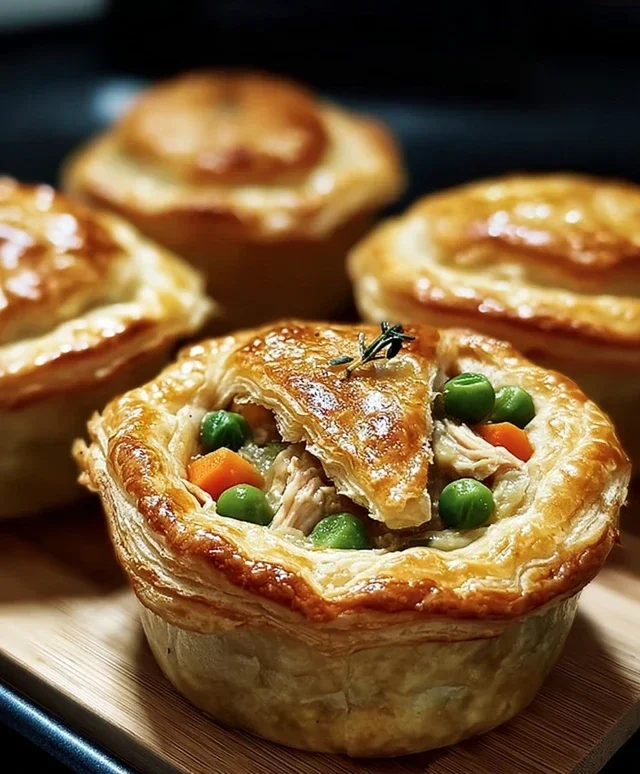
Easy Mini Chicken Pot Pies – Comfort Food Delight
Mini Chicken Pot Pies are the ultimate comfort food hug in edible form. There’s something undeniably delightful about that flaky, golden crust encasing a creamy, savory filling, isn’t there? I’ve always adored chicken pot pie, but let’s be honest, sometimes a full-sized pie feels a little… much. That’s where these adorable little gems come in! They capture all the classic flavors we crave – tender chicken, sweet peas and carrots, all swimming in a luscious, herb-infused sauce – but in a perfectly portioned package. What makes these mini chicken pot pies truly special is their versatility; they’re ideal for a cozy weeknight dinner, a charming appetizer for guests, or even a fun lunchbox surprise. Get ready to fall in love with this classic dish all over again, reinvented in the most delightful way.
Mini Chicken Pot Pies
There’s something incredibly comforting about a chicken pot pie. The creamy, savory filling encased in flaky pastry is pure comfort food. But sometimes, a full-sized pot pie feels like a commitment, or perhaps you’re just looking for perfectly portioned individual delights. That’s where these Mini Chicken Pot Pies come in! They’re ridiculously easy to make, especially with the magic of refrigerated biscuits, and they’re absolutely delightful. Whether you’re serving them as a weeknight dinner, an appetizer, or even a fun lunch for the kids, these little pies are guaranteed to be a hit. They’re warm, filling, and packed with all the classic flavors you love, just in a wonderfully convenient size. Plus, the smell that will fill your kitchen as they bake is simply divine!
Ingredients:
Cooking Instructions:
Let’s get started on these adorable and delicious mini pot pies. The beauty of this recipe is its simplicity, making it perfect for even begin extractner cooks. We’ll focus on creating that classic pot pie flavor profile with minimal fuss.
Preparing the Filling:
First things first, we need to prepare our savory chicken filling. You’ll want to start by dicing your boneless chicken breast into small, bite-sized pieces. Aim for roughly ½-inch cubes so they cook through evenly and are easy to eat in the mini pies. In a medium saucepan, combine the diced chicken, the cream of chicken soup, garlic powder, onion powder, and salt. Stir everything together until the chicken is well coated in the creamy soup mixture.
Cooking the Filling:
Now, place the saucepan over medium heat. We’re going to gently cook this mixture until the chicken is no longer pink and is cooked through. Stir occasionally to prevent any sticking on the bottom of the pan. This usually takes about 8-10 minutes, depending on the size of your chicken pieces. Once the chicken is cooked, stir in the frozen peas and carrots. Continue to cook for another 2-3 minutes, just until the vegetables are heated through and tender-crisp. We don’t want them to become mushy. Taste the filling at this point and adjust the salt and pepper if you feel it needs it. Remember, the biscuits will add a little saltiness, so be mindful of that. Set the filling aside to cool slightly while we prepare the pastry. Allowing it to cool a bit will make it easier to handle and prevent the hot filling from melting the biscuit dough too quickly.
Preparing the Biscuit “Crusts”:
While the filling is cooling, it’s time to get our biscuit bases ready. You’ll need a muffin tin for this recipe. Generously spray your muffin tin with cooking spray. This is crucial to ensure your mini pot pies don’t stick. Open your cans of refrigerated biscuits. You should have 16 biscuits in total. Take each biscuit and gently press it into the bottom and up the sides of each muffin cup. The goal is to create a little “cup” or “bowl” shape that will hold our delicious filling. Don’t worry if they don’t perfectly cover the sides; they will expand as they bake. You can gently stretch them a bit to help them conform to the shape of the muffin cup. Ensure there are no major holes in the bottom, or your filling might leak out.
Assembling the Mini Pot Pies:
Now for the fun part – assembling our mini pot pies! Carefully spoon the cooled chicken and vegetable filling into each biscuit-lined muffin cup. Fill them generously, but don’t overfill to the point where the filling will spill over the sides once the biscuit dough expands. You want a nice, substantial portion of filling in each one.
Baking the Pot Pies:
Preheat your oven to 375 degrees Fahrenheit (190 degrees Celsius). Once your oven is preheated and your muffin tin is filled, place it on the middle rack. Bake for 15-20 minutes, or until the biscuits are golden brown and cooked through. The filling should be bubbly around the edges. Keep an eye on them towards the end of the baking time; ovens can vary, and we want perfectly golden, not burnt, crusts.
Cooling and Serving:
Once they’re beautifully golden and bubbly, carefully remove the muffin tin from the oven. Let the mini pot pies cool in the muffin tin for about 5-10 minutes. This step is important because they will be very hot, and it allows them to set up slightly, making them easier to remove. After they’ve cooled a bit, you can gently loosen the edges with a knife or a small spatula and carefully lift them out of the muffin tin. Serve them warm and enjoy the delightful taste of homemade chicken pot pie in a perfectly portioned, easy-to-handle size! These are fantastic on their own, or you can serve them with a simple side salad for a complete meal. Enjoy every little bite of this comforting classic!
Conclusion:
There you have it – your guide to creating delightful mini chicken pot pies! These individual portions are wonderfully comforting, packed with tender chicken and creamy vegetables, all encased in a flaky pastry crust. They’re perfect for a cozy weeknight dinner, a charming appetizer for guests, or even a fun lunchbox surprise. The beauty of these mini pot pies lies in their versatility. Serve them as a standalone meal with a simple side salad, or pair them with roasted root vegetables for a heartier experience. Don’t be afraid to get creative with your fillings! Consider adding other vegetables like peas, corn, or diced celery, or even a touch of nutmeg for an extra layer of flavor. I truly encourage you to give this recipe a try. The satisfaction of pulling these golden beauties from the oven is immense, and I’m confident you’ll love every bite.
Frequently Asked Questions:
Can I make the pastry ahead of time?
Yes, absolutely! You can prepare the pastry dough up to two days in advance and store it in the refrigerator. Just ensure it’s well-wrapped. You can also freeze the unbaked mini chicken pot pies for up to a month. Thaw them overnight in the refrigerator before baking as directed.
What are some good vegetarian variations?
For a vegetarian version, simply omit the chicken and increase the amount of vegetables. A delicious combination includes potatoes, carrots, peas, corn, mushrooms, and leeks. You could also add a plant-based protein like firm tofu or white beans for extra substance.
Mini Chicken Pot Pies
Quick and easy mini chicken pot pies made with refrigerated biscuits, chicken, and a creamy vegetable filling.
Ingredients
-
2 cans refrigerated biscuits (8-count each)
-
½ lb boneless chicken breast, diced
-
1 cup frozen peas & carrots
-
1 can (10.5 oz) cream of chicken soup
-
½ tsp garlic powder
-
½ tsp onion powder
-
¼ tsp salt
-
Cooking spray
Instructions
-
Step 1
Preheat oven to 375°F (190°C). Lightly grease a mini muffin tin with cooking spray. -
Step 2
In a skillet over medium heat, cook the diced chicken until browned and cooked through. Drain any excess liquid. -
Step 3
Stir in the frozen peas and carrots, cream of chicken soup, garlic powder, onion powder, and salt. Cook until heated through, about 5 minutes. -
Step 4
Separate the refrigerated biscuit dough. Press each biscuit flat and then press it into a mini muffin cup, forming a crust. -
Step 5
Spoon the chicken and vegetable mixture into each biscuit-lined muffin cup. -
Step 6
Bake for 15-20 minutes, or until the biscuit crust is golden brown and the filling is bubbly. -
Step 7
Let cool slightly before carefully removing from the muffin tin. Serve warm.
Important Information
Nutrition Facts (Per Serving)
It is important to consider this information as approximate and not to use it as definitive health advice.
Allergy Information
Please check ingredients for potential allergens and consult a health professional if in doubt.